Streaming text to speech
This guide covers three approaches: generating speech as a file, streaming the audio response directly, and optionally uploading generated audio to an AWS S3 bucket to share via a signed URL.
Convert text to speech (file)
Section titled “Convert text to speech (file)”To convert text to speech and save it as a file, we’ll use the convert method of the ElevenLabs SDK and then it locally as a .mp3 file.
import os
import uuid
from dotenv import load_dotenv
from elevenlabs import VoiceSettings
from elevenlabs.client import ElevenLabs

load_dotenv()

ELEVENLABS_API_KEY = os.getenv("ELEVENLABS_API_KEY")
elevenlabs = ElevenLabs(
    api_key=ELEVENLABS_API_KEY,
)


def text_to_speech_file(text: str) -> str:
    # Calling the text_to_speech conversion API with detailed parameters
    response = elevenlabs.text_to_speech.convert(
        voice_id="pNInz6obpgDQGcFmaJgB", # Adam pre-made voice
        output_format="mp3_22050_32",
        text=text,
        model_id="eleven_flash_v2_5", # use the flash model for low latency
        # Optional voice settings that allow you to customize the output
        voice_settings=VoiceSettings(
            stability=0.0,
            similarity_boost=1.0,
            style=0.0,
            use_speaker_boost=True,
            speed=1.0,
        ),
    )

    # uncomment the line below to play the audio back
    # play(response)

    # Generating a unique file name for the output MP3 file
    save_file_path = f"{uuid.uuid4()}.mp3"

    # Writing the audio to a file
    with open(save_file_path, "wb") as f:
        for chunk in response:
            if chunk:
                f.write(chunk)

    print(f"{save_file_path}: A new audio file was saved successfully!")

    # Return the path of the saved audio file
    return save_file_path
import { ElevenLabsClient } from "@elevenlabs/elevenlabs-js";
import * as dotenv from "dotenv";
import { createWriteStream } from "fs";
import { v4 as uuid } from "uuid";

dotenv.config();

const ELEVENLABS_API_KEY = process.env.ELEVENLABS_API_KEY;

const elevenlabs = new ElevenLabsClient({
  apiKey: ELEVENLABS_API_KEY,
});

export const createAudioFileFromText = async (text: string): Promise<string> => {
  return new Promise<string>(async (resolve, reject) => {
    try {
      const audio = await elevenlabs.textToSpeech.convert("JBFqnCBsd6RMkjVDRZzb", {
        modelId: "eleven_v4",
        text,
        outputFormat: "mp3_44100_128",
        // Optional voice settings that allow you to customize the output
        voiceSettings: {
          stability: 0,
          similarityBoost: 0,
          useSpeakerBoost: true,
          speed: 1.0,
        },
      });

      const fileName = `${uuid()}.mp3`;
      const fileStream = createWriteStream(fileName);

      audio.pipe(fileStream);
      fileStream.on("finish", () => resolve(fileName)); // Resolve with the fileName
      fileStream.on("error", reject);
    } catch (error) {
      reject(error);
    }
  });
};
You can then run this function with:
text_to_speech_file("Hello World")await createAudioFileFromText("Hello World");Convert text to speech (streaming)
Section titled “Convert text to speech (streaming)”If you prefer to stream the audio directly without saving it to a file, you can use our streaming feature.
import os
from typing import IO
from io import BytesIO
from dotenv import load_dotenv
from elevenlabs import VoiceSettings
from elevenlabs.client import ElevenLabs

load_dotenv()

ELEVENLABS_API_KEY = os.getenv("ELEVENLABS_API_KEY")
elevenlabs = ElevenLabs(
    api_key=ELEVENLABS_API_KEY,
)


def text_to_speech_stream(text: str) -> IO[bytes]:
    # Perform the text-to-speech conversion
    response = elevenlabs.text_to_speech.stream(
        voice_id="pNInz6obpgDQGcFmaJgB", # Adam pre-made voice
        output_format="mp3_22050_32",
        text=text,
        model_id="eleven_multilingual_v2",
        # Optional voice settings that allow you to customize the output
        voice_settings=VoiceSettings(
            stability=0.0,
            similarity_boost=1.0,
            style=0.0,
            use_speaker_boost=True,
            speed=1.0,
        ),
    )

    # Create a BytesIO object to hold the audio data in memory
    audio_stream = BytesIO()

    # Write each chunk of audio data to the stream
    for chunk in response:
        if chunk:
            audio_stream.write(chunk)

    # Reset stream position to the beginning
    audio_stream.seek(0)

    # Return the stream for further use
    return audio_stream
import { ElevenLabsClient } from "@elevenlabs/elevenlabs-js";
import * as dotenv from "dotenv";

dotenv.config();

const ELEVENLABS_API_KEY = process.env.ELEVENLABS_API_KEY;

if (!ELEVENLABS_API_KEY) {
  throw new Error("Missing ELEVENLABS_API_KEY in environment variables");
}

const elevenlabs = new ElevenLabsClient({
  apiKey: ELEVENLABS_API_KEY,
});

export const createAudioStreamFromText = async (text: string): Promise<Buffer> => {
  const audioStream = await elevenlabs.textToSpeech.stream("JBFqnCBsd6RMkjVDRZzb", {
    modelId: "eleven_v4",
    text,
    outputFormat: "mp3_44100_128",
    // Optional voice settings that allow you to customize the output
    voiceSettings: {
      stability: 0,
      similarityBoost: 1.0,
      useSpeakerBoost: true,
      speed: 1.0,
    },
  });

  const chunks: Buffer[] = [];
  for await (const chunk of audioStream) {
    chunks.push(chunk);
  }

  const content = Buffer.concat(chunks);
  return content;
};
You can then run this function with:
text_to_speech_stream("This is James")await createAudioStreamFromText("This is James");Bonus - Uploading to AWS S3 and getting a secure sharing link
Section titled “Bonus - Uploading to AWS S3 and getting a secure sharing link”Once your audio data is created as either a file or a stream you might want to share this with your users. One way to do this is to upload it to an AWS S3 bucket and generate a secure sharing link.
Creating your AWS credentials
Section titled “Creating your AWS credentials”To upload the data to S3 you’ll need to add your AWS access key ID, secret access key and AWS region name to your .env file. Follow these steps to find the credentials:
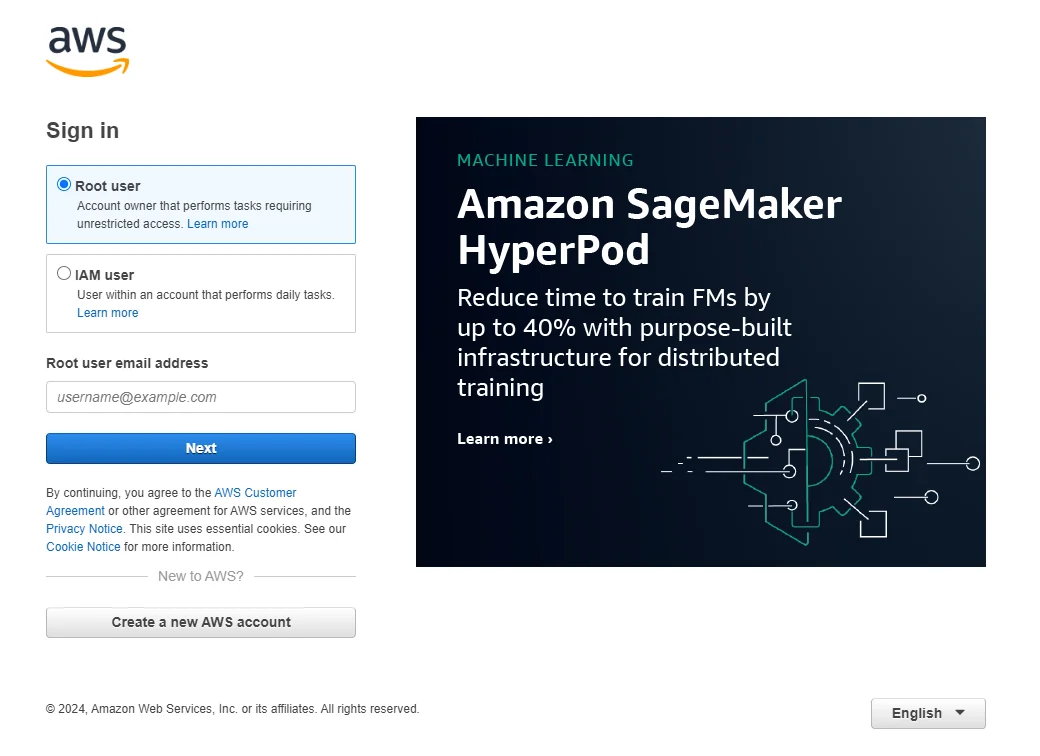
- Log in to your AWS Management Console: Navigate to the AWS home page and sign in with your account.
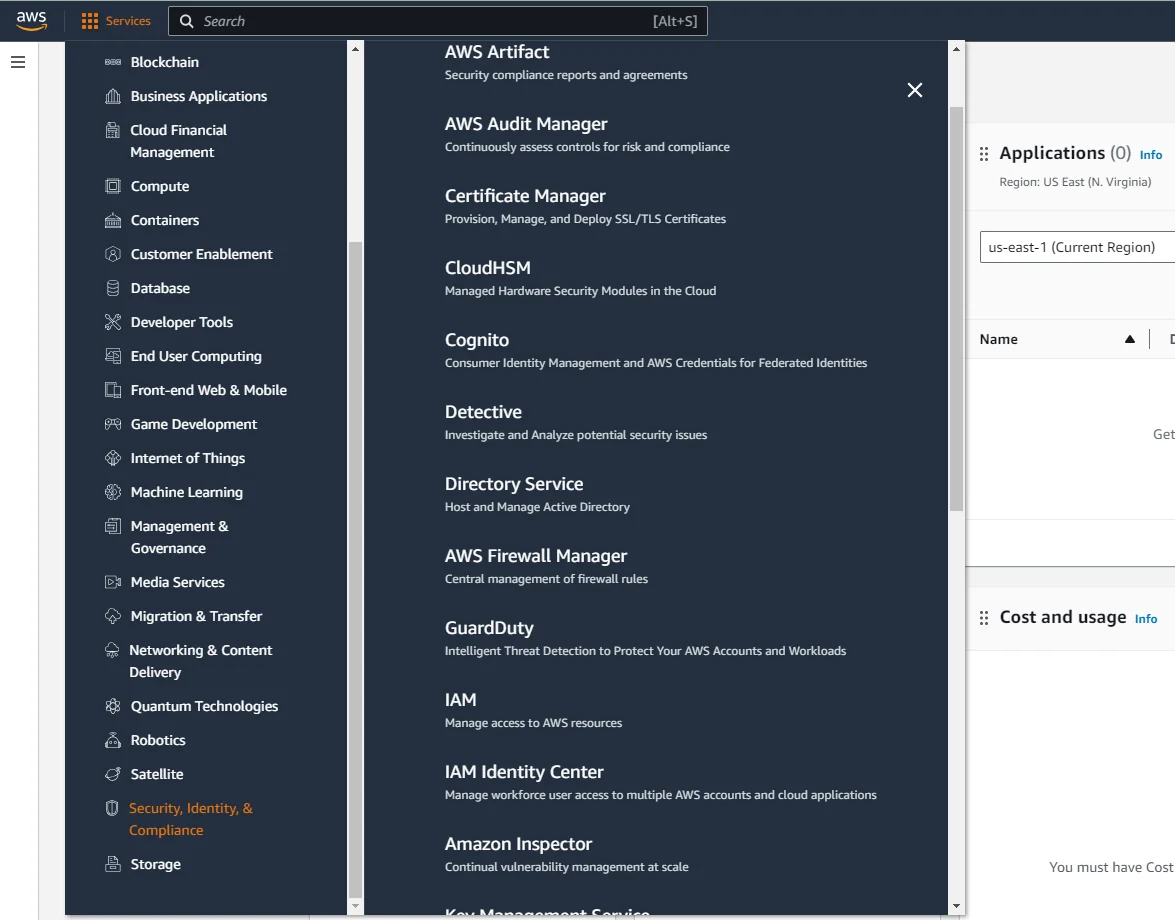
- Access the IAM (Identity and Access Management) Dashboard: You can find IAM under "Security, Identity, & Compliance" on the services menu. The IAM dashboard manages access to your AWS services securely.
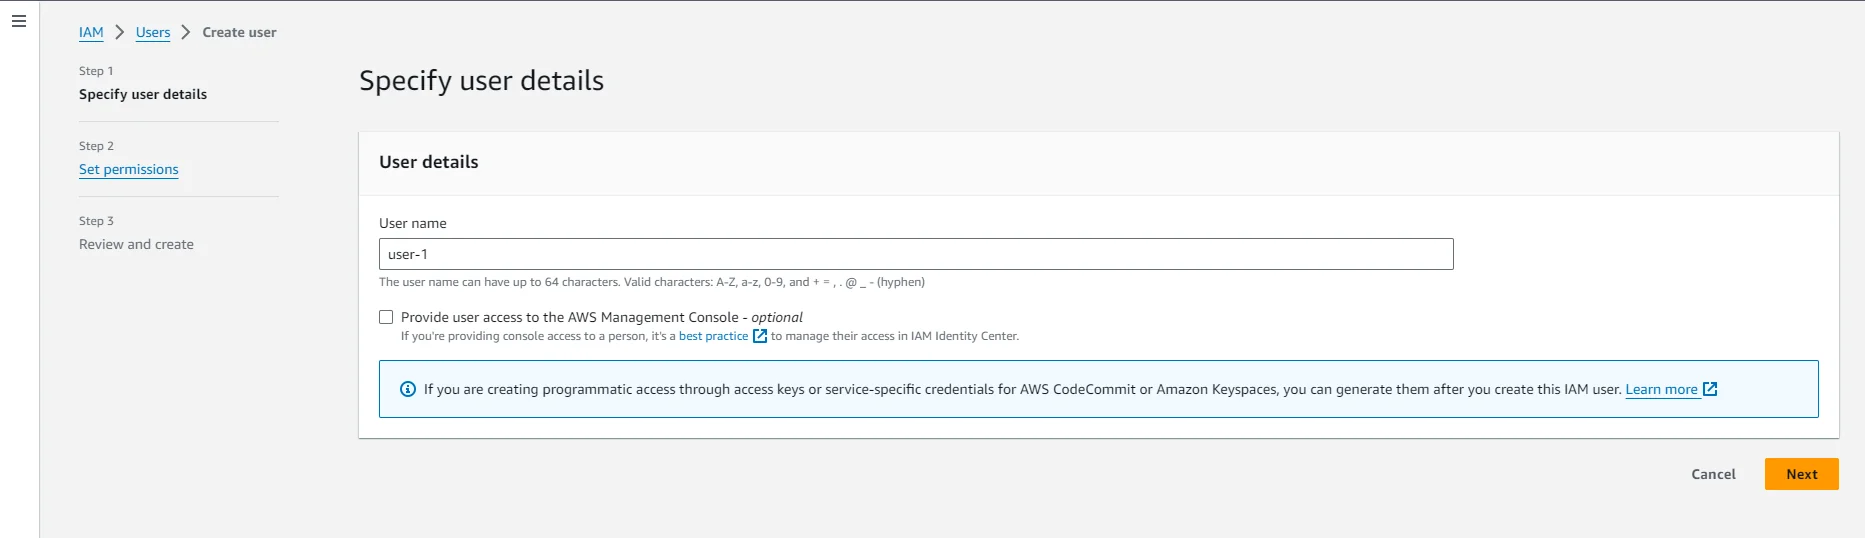
- Create a New User (if necessary): On the IAM dashboard, select "Users" and then "Add user". Enter a user name.
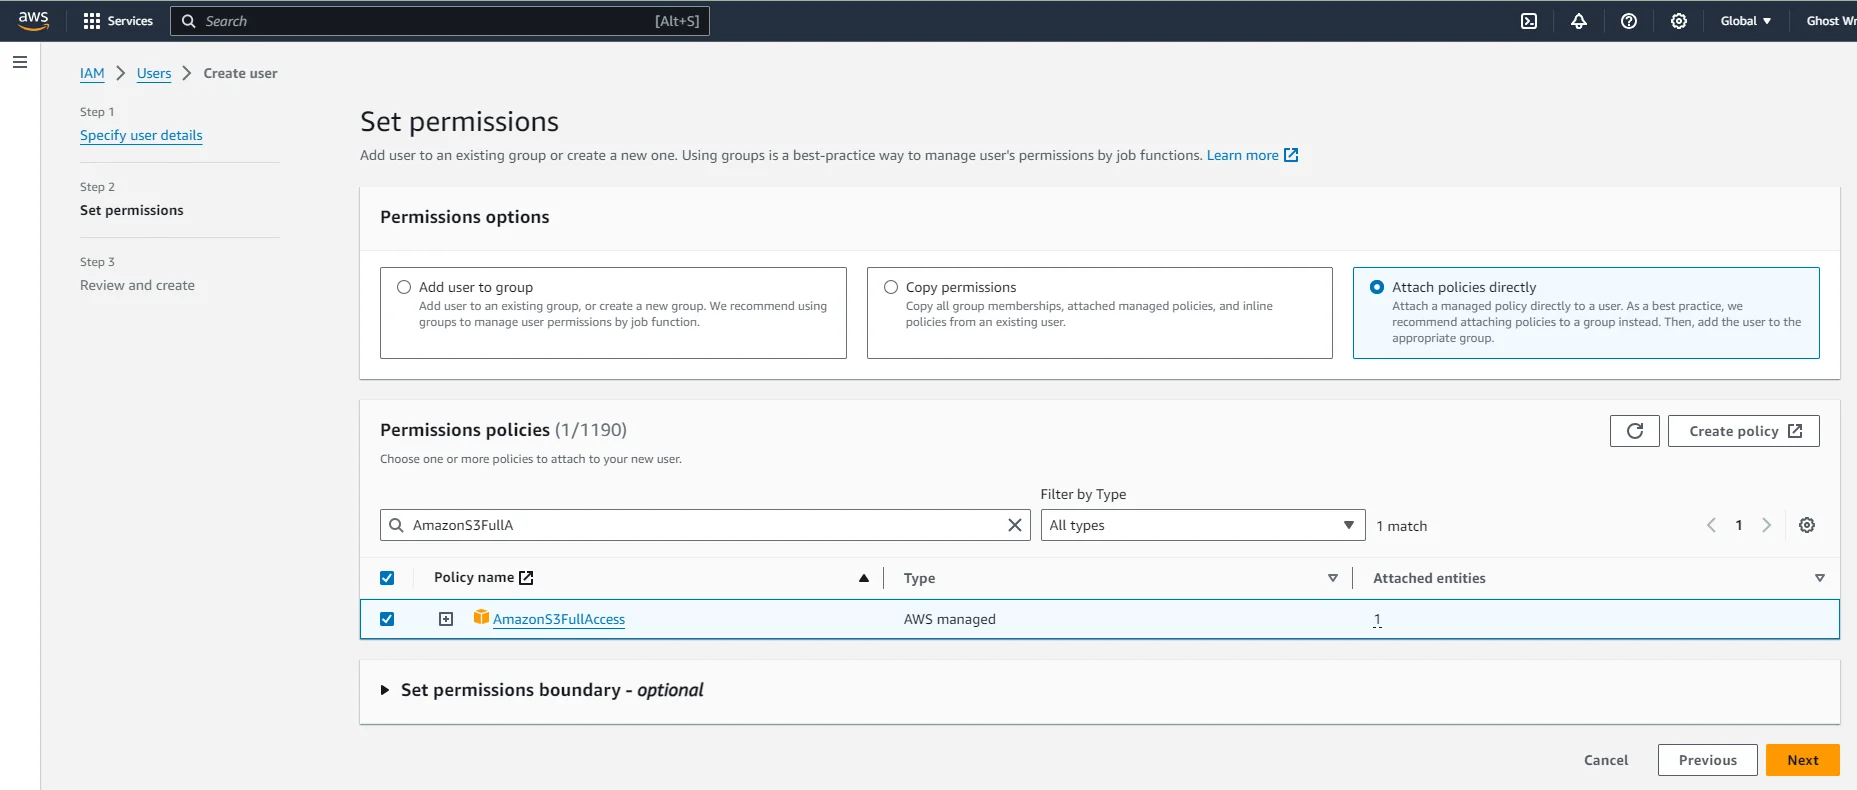
- Set the permissions: attach policies directly to the user according to the access level you wish to grant. For S3 uploads, you can use the AmazonS3FullAccess policy. However, it's best practice to grant least privilege, or the minimal permissions necessary to perform a task. You might want to create a custom policy that specifically allows only the necessary actions on your S3 bucket.
- Review and create the user: Review your settings and create the user. Upon creation, you'll be presented with an access key ID and a secret access key. Be sure to download and securely save these credentials; the secret access key cannot be retrieved again after this step.
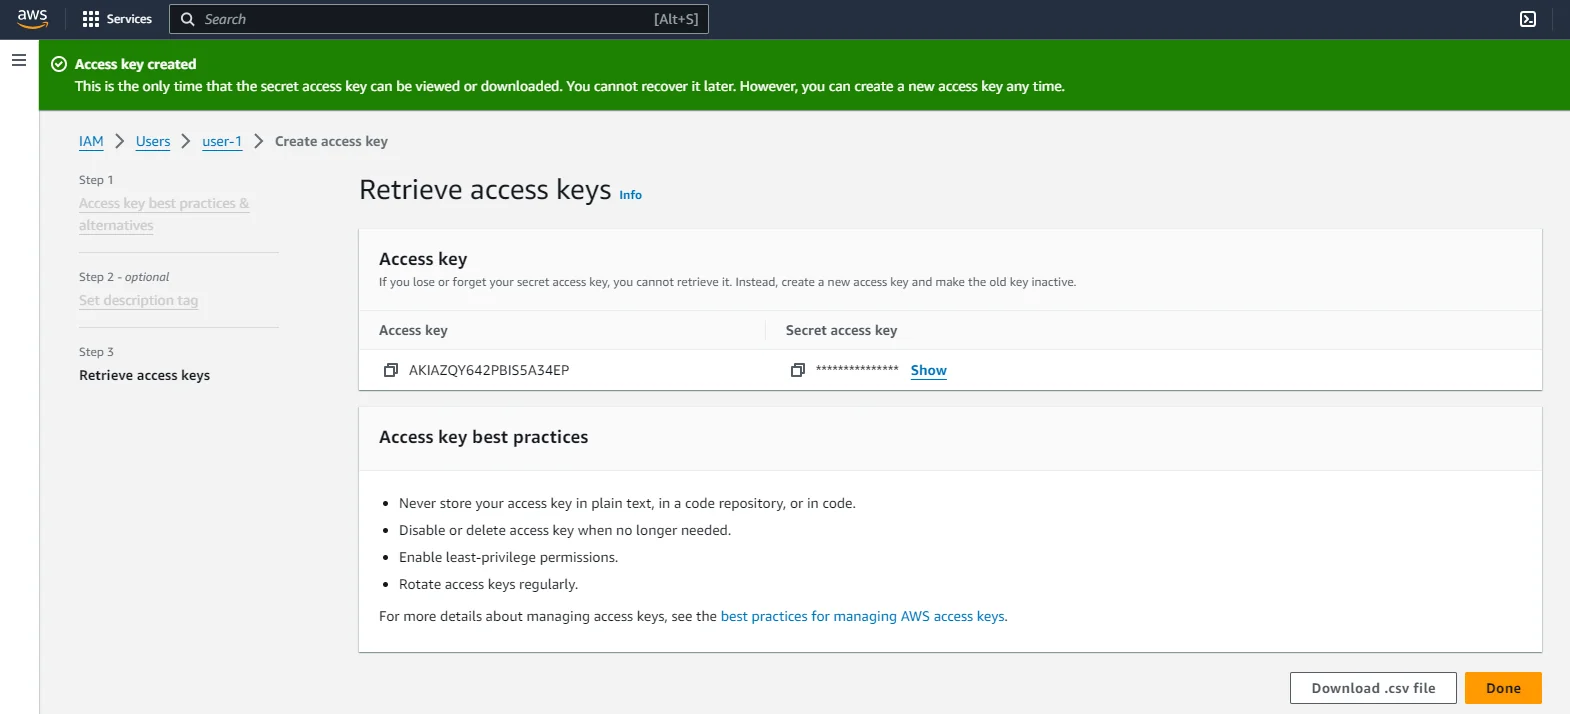
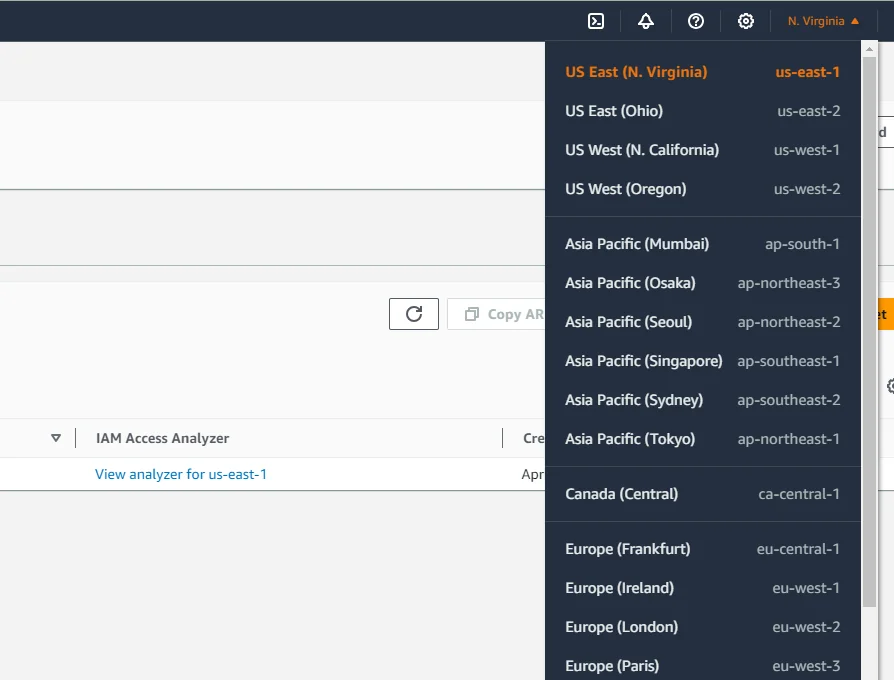
- Get AWS region name: ex. us-east-1
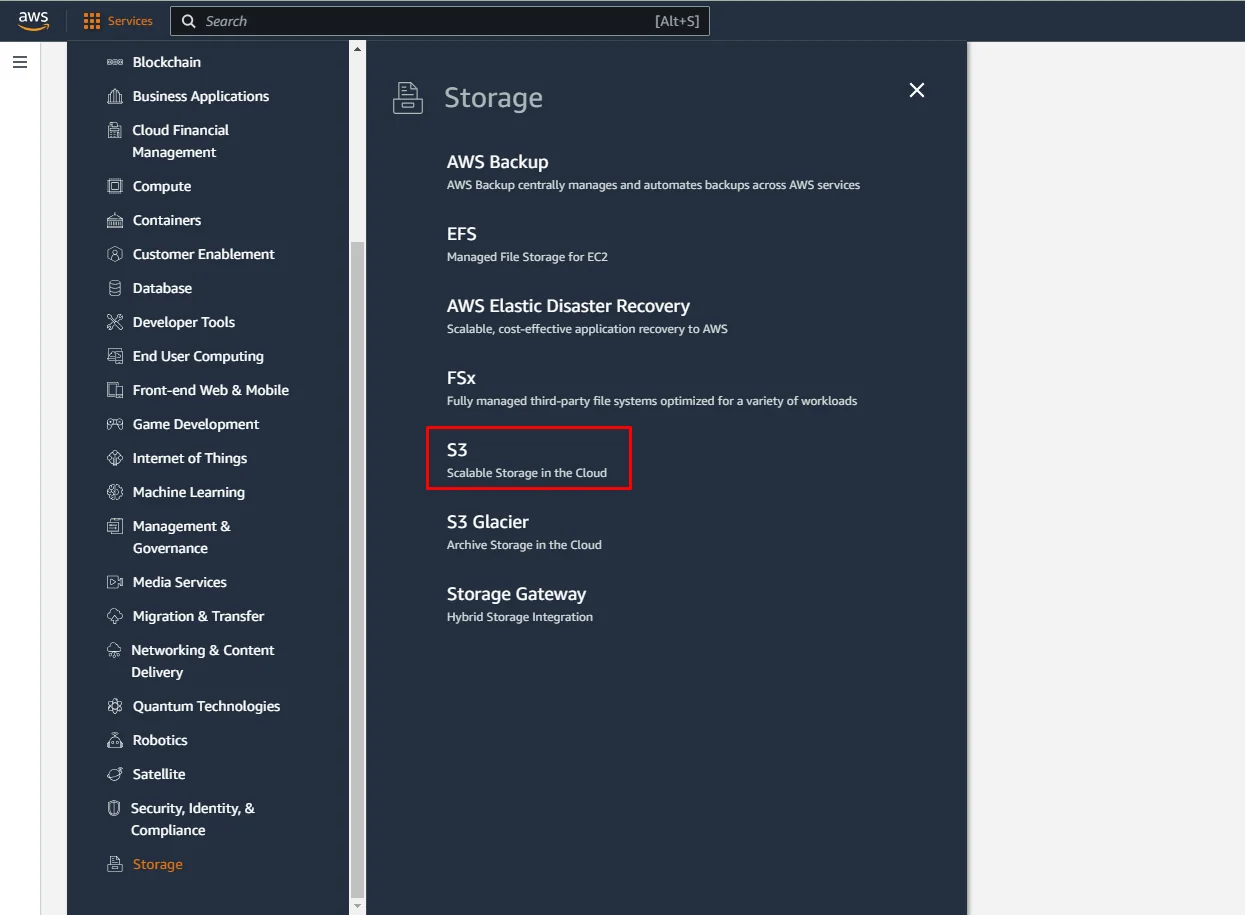
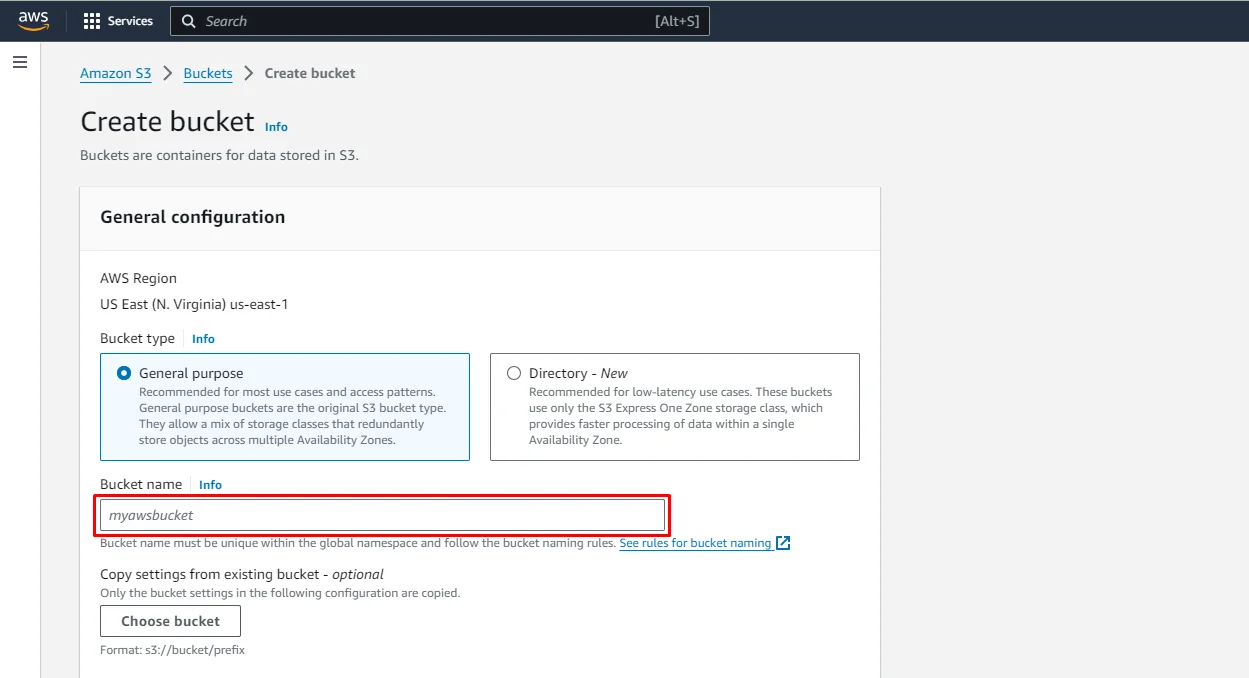
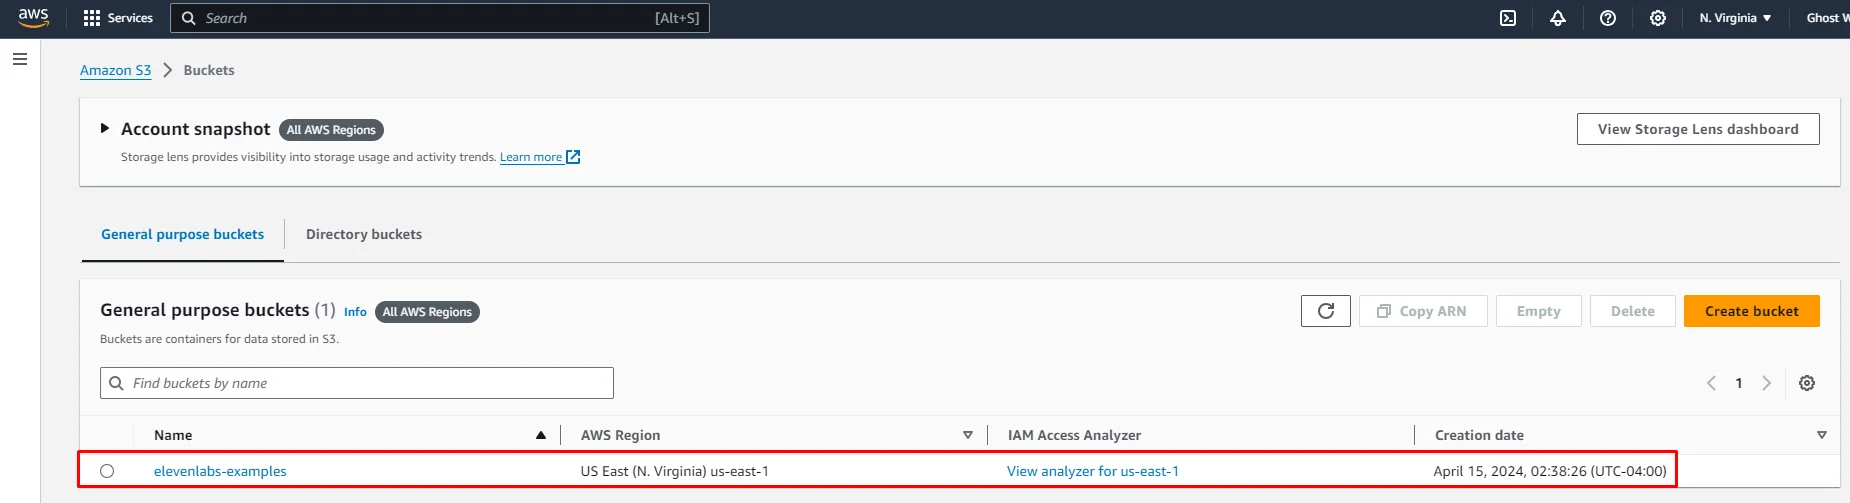
If you do not have an AWS S3 bucket, you will need to create a new one by following these steps:
- Access the S3 dashboard: You can find S3 under "Storage" on the services menu.
- Create a new bucket: On the S3 dashboard, click the "Create bucket" button.
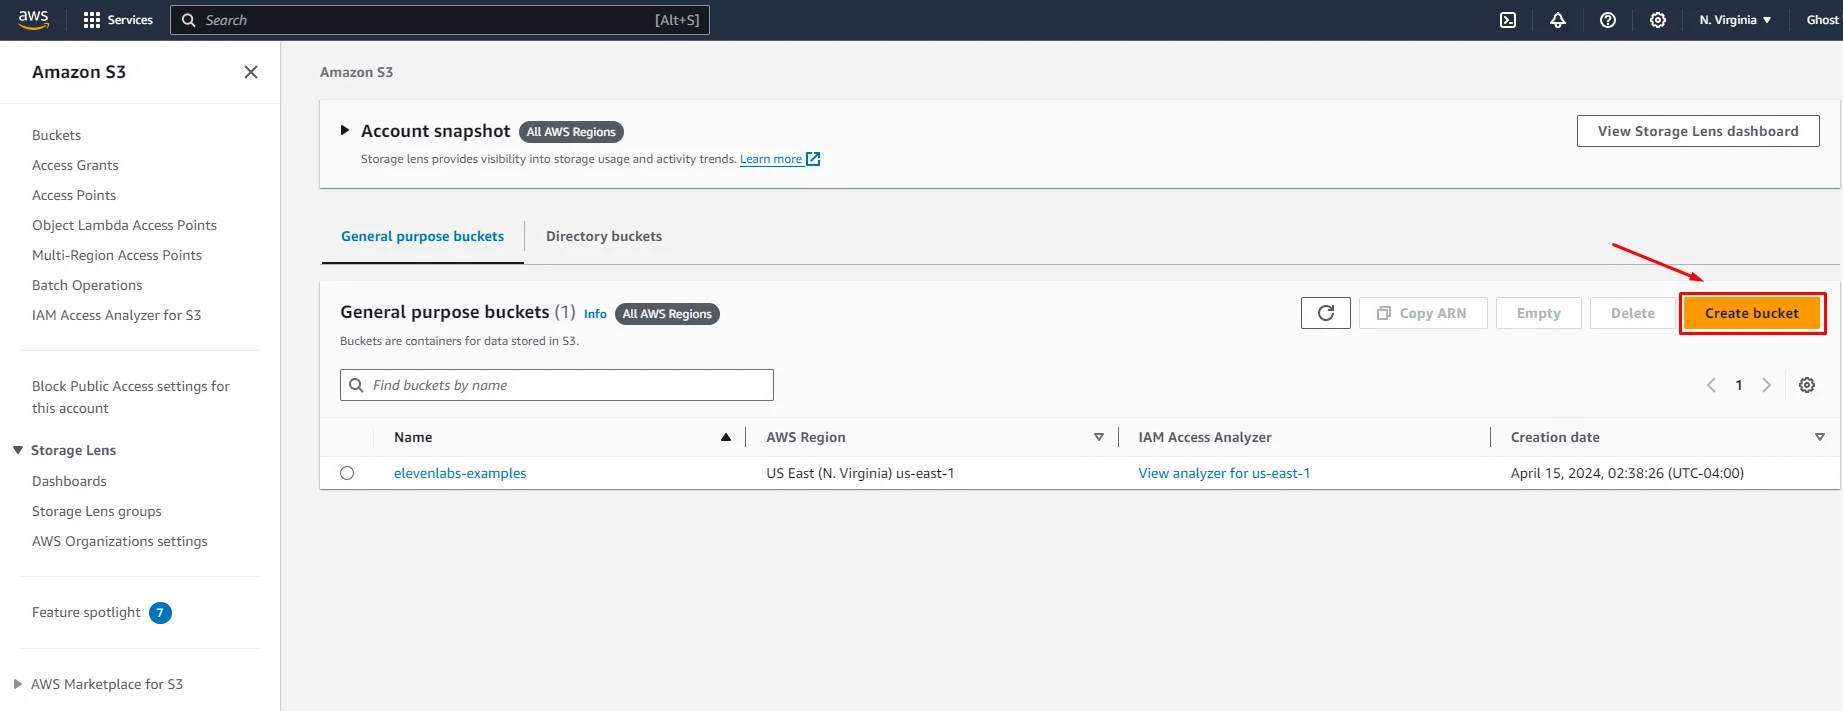
- Enter a bucket name and click on the "Create bucket" button. You can leave the other bucket options as default. The newly added bucket will appear in the list.
Installing the AWS SDK and adding the credentials
Section titled “Installing the AWS SDK and adding the credentials”Install boto3 for interacting with AWS services using pip and npm.
pip install boto3npm install @aws-sdk/client-s3
npm install @aws-sdk/s3-request-presignerThen add the environment variables to .env file like so:
AWS_ACCESS_KEY_ID=your_aws_access_key_id_here
AWS_SECRET_ACCESS_KEY=your_aws_secret_access_key_here
AWS_REGION_NAME=your_aws_region_name_here
AWS_S3_BUCKET_NAME=your_s3_bucket_name_here
Uploading to AWS S3 and generating the signed URL
Section titled “Uploading to AWS S3 and generating the signed URL”Add the following functions to upload the audio stream to S3 and generate a signed URL.
import os
import boto3
import uuid

AWS_ACCESS_KEY_ID = os.getenv("AWS_ACCESS_KEY_ID")
AWS_SECRET_ACCESS_KEY = os.getenv("AWS_SECRET_ACCESS_KEY")
AWS_REGION_NAME = os.getenv("AWS_REGION_NAME")
AWS_S3_BUCKET_NAME = os.getenv("AWS_S3_BUCKET_NAME")

session = boto3.Session(
    aws_access_key_id=AWS_ACCESS_KEY_ID,
    aws_secret_access_key=AWS_SECRET_ACCESS_KEY,
    region_name=AWS_REGION_NAME,
)
s3 = session.client("s3")


def generate_presigned_url(s3_file_name: str) -> str:
    signed_url = s3.generate_presigned_url(
        "get_object",
        Params={"Bucket": AWS_S3_BUCKET_NAME, "Key": s3_file_name},
        ExpiresIn=3600,
    )  # URL expires in 1 hour
    return signed_url


def upload_audiostream_to_s3(audio_stream) -> str:
    s3_file_name = f"{uuid.uuid4()}.mp3"  # Generates a unique file name using UUID
    s3.upload_fileobj(audio_stream, AWS_S3_BUCKET_NAME, s3_file_name)

    return s3_file_name
import { S3Client, PutObjectCommand, GetObjectCommand } from "@aws-sdk/client-s3";
import { getSignedUrl } from "@aws-sdk/s3-request-presigner";
import * as dotenv from "dotenv";
import { v4 as uuid } from "uuid";

dotenv.config();

const { AWS_ACCESS_KEY_ID, AWS_SECRET_ACCESS_KEY, AWS_REGION_NAME, AWS_S3_BUCKET_NAME } =
  process.env;

if (!AWS_ACCESS_KEY_ID || !AWS_SECRET_ACCESS_KEY || !AWS_REGION_NAME || !AWS_S3_BUCKET_NAME) {
  throw new Error("One or more environment variables are not set. Please check your .env file.");
}

const s3 = new S3Client({
  credentials: {
    accessKeyId: AWS_ACCESS_KEY_ID,
    secretAccessKey: AWS_SECRET_ACCESS_KEY,
  },
  region: AWS_REGION_NAME,
});

export const generatePresignedUrl = async (objectKey: string) => {
  const getObjectParams = {
    Bucket: AWS_S3_BUCKET_NAME,
    Key: objectKey,
    Expires: 3600,
  };
  const command = new GetObjectCommand(getObjectParams);
  const url = await getSignedUrl(s3, command, { expiresIn: 3600 });
  return url;
};

export const uploadAudioStreamToS3 = async (audioStream: Buffer) => {
  const remotePath = `${uuid()}.mp3`;
  await s3.send(
    new PutObjectCommand({
      Bucket: AWS_S3_BUCKET_NAME,
      Key: remotePath,
      Body: audioStream,
      ContentType: "audio/mpeg",
    })
  );
  return remotePath;
};
You can then call uploading function with the audio stream from the text.
s3_file_name = upload_audiostream_to_s3(audio_stream)const s3path = await uploadAudioStreamToS3(stream);After uploading the audio file to S3, generate a signed URL to share access to the file. This URL will be time-limited, meaning it will expire after a certain period, making it secure for temporary sharing.
You can now generate a URL from a file with:
signed_url = generate_presigned_url(s3_file_name)
print(f"Signed URL to access the file: {signed_url}")const presignedUrl = await generatePresignedUrl(s3path);
console.log("Presigned URL:", presignedUrl);If you want to use the file multiple times, you should store the s3 file path in your database and then regenerate the signed URL each time you need rather than saving the signed URL directly as it will expire.
Putting it all together
Section titled “Putting it all together”To put it all together, you can use the following script:
import os
from dotenv import load_dotenv
load_dotenv()
from text_to_speech_stream import text_to_speech_stream
from s3_uploader import upload_audiostream_to_s3, generate_presigned_url
def main():
text = "This is James"
audio_stream = text_to_speech_stream(text)
s3_file_name = upload_audiostream_to_s3(audio_stream)
signed_url = generate_presigned_url(s3_file_name)
print(f"Signed URL to access the file: {signed_url}")
if __name__ == "__main__":
main()
import "dotenv/config";
import { generatePresignedUrl, uploadAudioStreamToS3 } from "./s3_uploader";
import { createAudioFileFromText } from "./text_to_speech_file";
import { createAudioStreamFromText } from "./text_to_speech_stream";
(async () => {
// save the audio file to disk
const fileName = await createAudioFileFromText(
"Today, the sky is exceptionally clear, and the sun shines brightly."
);
console.log("File name:", fileName);
// OR stream the audio, upload to S3, and get a presigned URL
const stream = await createAudioStreamFromText(
"Today, the sky is exceptionally clear, and the sun shines brightly."
);
const s3path = await uploadAudioStreamToS3(stream);
const presignedUrl = await generatePresignedUrl(s3path);
console.log("Presigned URL:", presignedUrl);
})();Conclusion
Section titled “Conclusion”You now know how to convert text into speech and generate a signed URL to share the audio file. This functionality opens up numerous opportunities for creating and sharing content dynamically.
Here are some examples of what you could build with this.
-
Educational Podcasts: Create personalized educational content that can be accessed by students on demand. Teachers can convert their lessons into audio format, upload them to S3, and share the links with students for a more engaging learning experience outside the traditional classroom setting.
-
Accessibility Features for Websites: Enhance website accessibility by offering text content in audio format. This can make information on websites more accessible to individuals with visual impairments or those who prefer auditory learning.
-
Automated Customer Support Messages: Produce automated and personalized audio messages for customer support, such as FAQs or order updates. This can provide a more engaging customer experience compared to traditional text emails.
-
Audio Books and Narration: Convert entire books or short stories into audio format, offering a new way for audiences to enjoy literature. Authors and publishers can diversify their content offerings and reach audiences who prefer listening over reading.
-
Language Learning Tools: Develop language learning aids that provide learners with audio lessons and exercises. This makes it possible to practice pronunciation and listening skills in a targeted way.
Next steps
Section titled “Next steps”Use WebSockets to stream text to speech in real time as it is generated by an LLM.
Learn what contributes to latency and how to minimise time-to-first-audio.