Sending generated audio through Twilio
In this guide, you'll learn how to send an AI generated message through a phone call using Twilio and ElevenLabs. This process allows you to send high-quality voice messages directly to your callers.
Create accounts with Twilio and ngrok
Section titled “Create accounts with Twilio and ngrok”We'll be using Twilio and ngrok for this guide, so go ahead and create accounts with them.
Create the server with Express
Section titled “Create the server with Express”Initialize your project
Section titled “Initialize your project”Create a new folder for your project
mkdir elevenlabs-twilio
cd elevenlabs-twilio
npm init -y
Install dependencies
Section titled “Install dependencies”npm install @elevenlabs/elevenlabs-js express express-ws twilioInstall dev dependencies
Section titled “Install dev dependencies”npm i @types/node @types/express @types/express-ws @types/ws dotenv tsx typescriptCreate your files
Section titled “Create your files”// src/app.ts
import { ElevenLabsClient } from "@elevenlabs/elevenlabs-js";
import "dotenv/config";
import express, { Response } from "express";
import ExpressWs from "express-ws";
import { Readable } from "stream";
import VoiceResponse from "twilio/lib/twiml/VoiceResponse";
import { type WebSocket } from "ws";
const app = ExpressWs(express()).app;
const PORT: number = parseInt(process.env.PORT || "5000");
const elevenlabs = new ElevenLabsClient();
const voiceId = "aMSt68OGf4xUZAnLpTU8";
const outputFormat = "ulaw_8000";
const text = "This is a test. You can now hang up. Thank you.";
function startApp() {
app.post("/call/incoming", (_, res: Response) => {
const twiml = new VoiceResponse();
twiml.connect().stream({
url: `wss://${process.env.SERVER_DOMAIN}/call/connection`,
});
res.writeHead(200, { "Content-Type": "text/xml" });
res.end(twiml.toString());
});
app.ws("/call/connection", (ws: WebSocket) => {
ws.on("message", async (data: string) => {
const message: {
event: string;
start?: { streamSid: string; callSid: string };
} = JSON.parse(data);
if (message.event === "start" && message.start) {
const streamSid = message.start.streamSid;
const response = await elevenlabs.textToSpeech.convert(voiceId, {
modelId: "eleven_flash_v2_5",
outputFormat: outputFormat,
text,
});
const readableStream = Readable.from(response);
const audioArrayBuffer = await streamToArrayBuffer(readableStream);
ws.send(
JSON.stringify({
streamSid,
event: "media",
media: {
payload: Buffer.from(audioArrayBuffer as any).toString("base64"),
},
})
);
}
});
ws.on("error", console.error);
});
app.listen(PORT, () => {
console.log(`Local: http://localhost:${PORT}`);
console.log(`Remote: https://${process.env.SERVER_DOMAIN}`);
});
}
function streamToArrayBuffer(readableStream: Readable) {
return new Promise((resolve, reject) => {
const chunks: Buffer[] = [];
readableStream.on("data", (chunk) => {
chunks.push(chunk);
});
readableStream.on("end", () => {
resolve(Buffer.concat(chunks).buffer);
});
readableStream.on("error", reject);
});
}
startApp();# .env
SERVER_DOMAIN=
ELEVENLABS_API_KEY=Understanding the code
Section titled “Understanding the code”Handling the incoming call
Section titled “Handling the incoming call”When you call your number, Twilio makes a POST request to your endpoint at /call/incoming.
We then use twiml.connect to tell Twilio that we want to handle the call via our websocket by setting the url to our /call/connection endpoint.
function startApp() {
  app.post('/call/incoming', (_, res: Response) => {
    const twiml = new VoiceResponse();

    twiml.connect().stream({
      url: `wss://${process.env.SERVER_DOMAIN}/call/connection`,
    });

    res.writeHead(200, { 'Content-Type': 'text/xml' });
    res.end(twiml.toString());
  });
Creating the text to speech
Section titled “Creating the text to speech”Here we listen for messages that Twilio sends to our websocket endpoint. When we receive a start message event, we generate audio using the ElevenLabs TypeScript SDK.
  app.ws('/call/connection', (ws: WebSocket) => {
    ws.on('message', async (data: string) => {
      const message: {
        event: string;
        start?: { streamSid: string; callSid: string };
      } = JSON.parse(data);

      if (message.event === 'start' && message.start) {
        const streamSid = message.start.streamSid;
        const response = await elevenlabs.textToSpeech.convert(voiceId, {
          modelId: 'eleven_flash_v2_5',
          outputFormat: outputFormat,
          text,
        });
Sending the message
Section titled “Sending the message”Upon receiving the audio back from ElevenLabs, we convert it to an array buffer and send the audio to Twilio via the websocket.
const readableStream = Readable.from(response);
const audioArrayBuffer = await streamToArrayBuffer(readableStream);

ws.send(
  JSON.stringify({
    streamSid,
    event: "media",
    media: {
      payload: Buffer.from(audioArrayBuffer as any).toString("base64"),
    },
  })
);
Point ngrok to your application
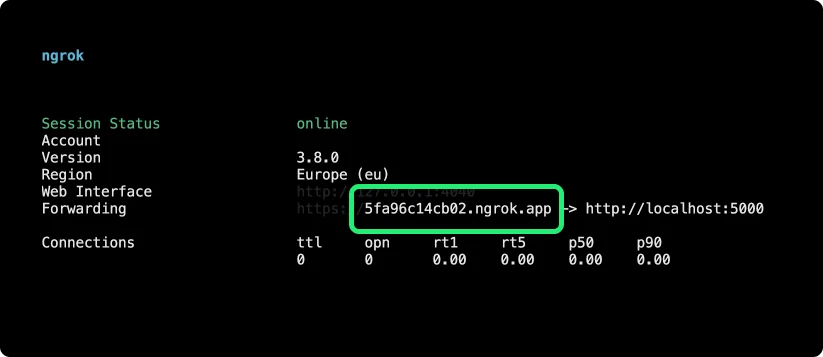
Section titled “Point ngrok to your application”Twilio requires a publicly accessible URL. We'll use ngrok to forward the local port of our application and expose it as a public URL.
Run the following command in your terminal:
ngrok http 5000Copy the ngrok domain (without https://) to use in your environment variables.
Update your environment variables
Section titled “Update your environment variables”Update the .env file with your ngrok domain and ElevenLabs API key.
# .env
SERVER_DOMAIN=*******.ngrok.app
ELEVENLABS_API_KEY=*************************
Start the application
Section titled “Start the application”Run the following command to start the app:
npm run devSet up Twilio
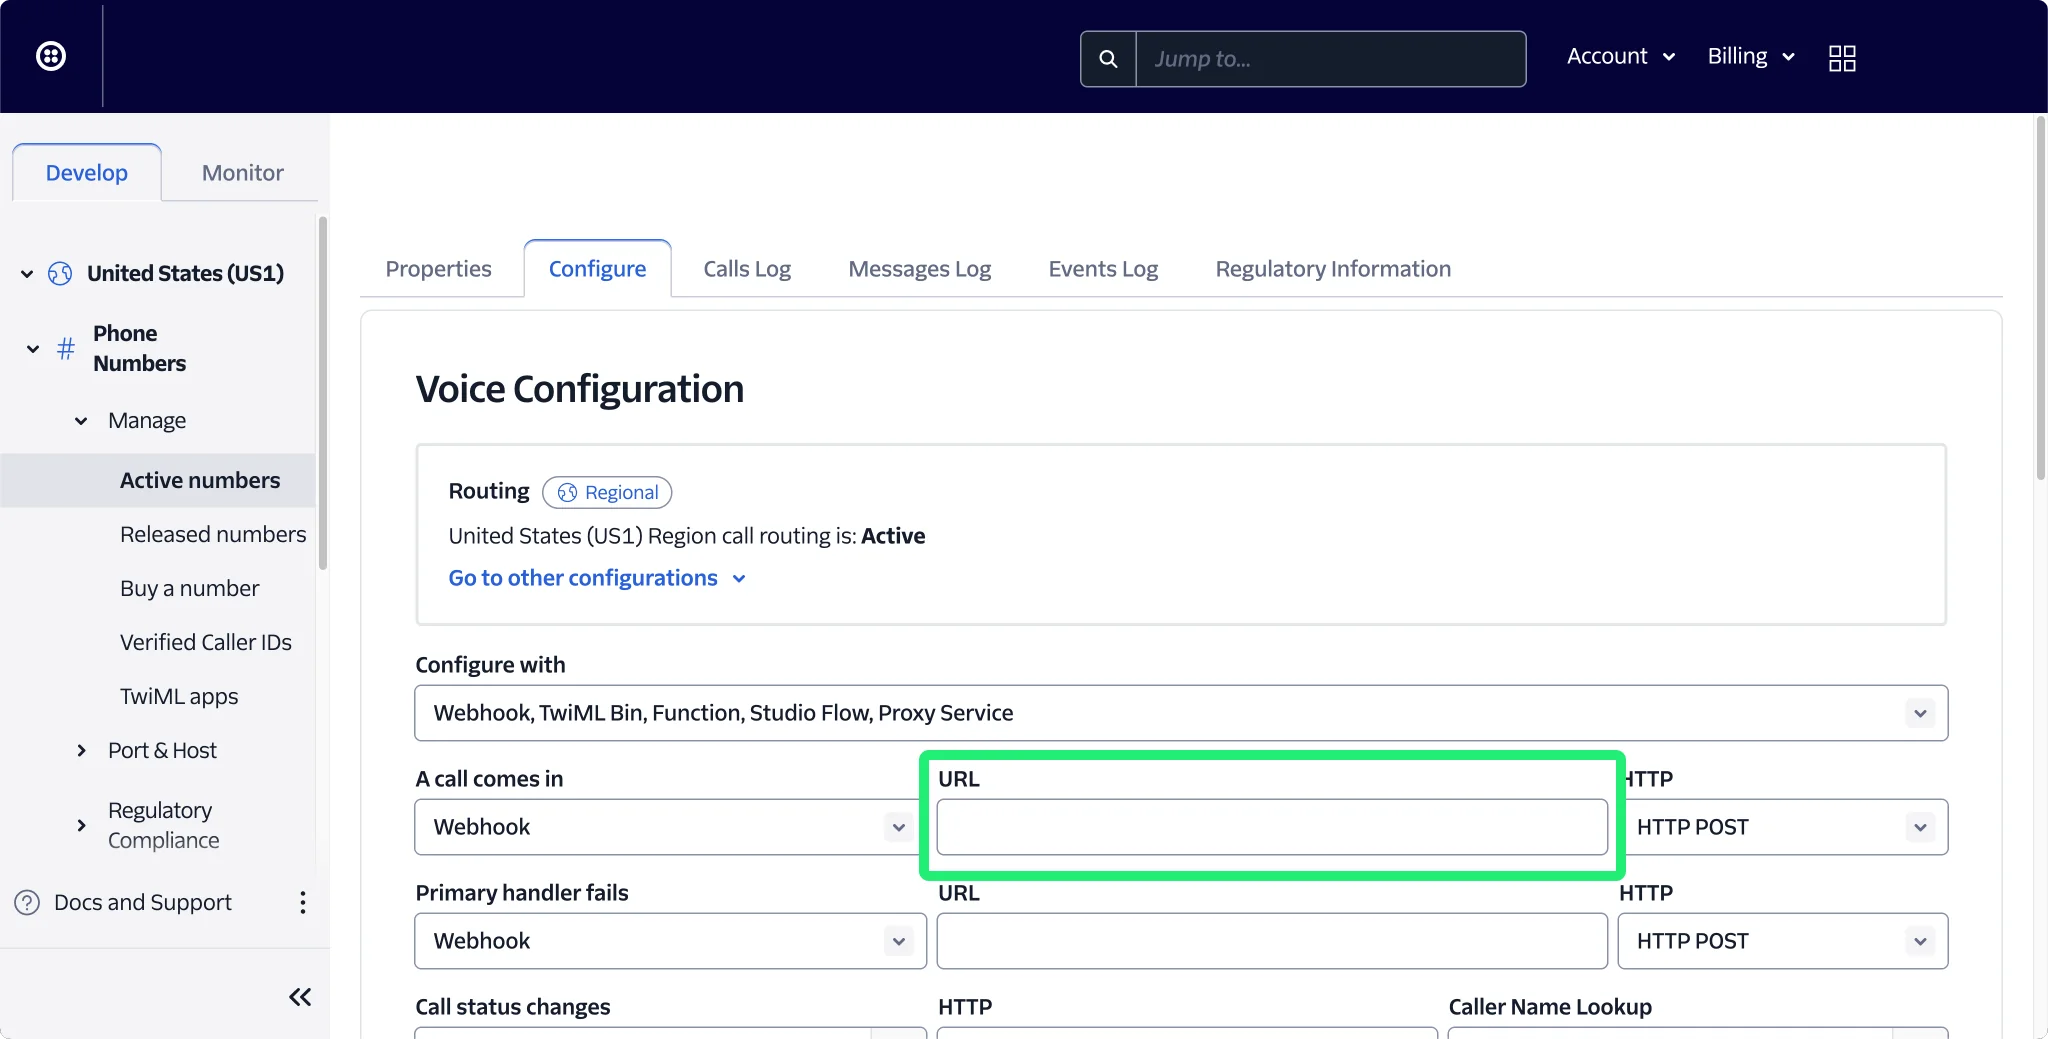
Section titled “Set up Twilio”Follow Twilio's guides to create a new number. Once you've created your number, navigate to the "Configure" tab in Phone Numbers -> Manage -> Active numbers
In the "A call comes in" section, enter the full URL to your application (make sure to add the/call/incoming path):
E.g. https://***ngrok.app/call/incoming
Make a phone call
Section titled “Make a phone call”Make a call to your number. You should hear a message using the ElevenLabs voice.
Tips for deploying to production
Section titled “Tips for deploying to production”When running the application in production, make sure to set the SERVER_DOMAIN environment variable to that of your server. Be sure to also update the URL in Twilio to point to your production server.
Conclusion
Section titled “Conclusion”You should now have a basic understanding of integrating Twilio with ElevenLabs voices. If you have any further questions, or suggestions on how to improve this blog post, please feel free to select the "Suggest edits" or "Raise issue" button below.