Zendesk
Connect your ElevenLabs agents with Zendesk Support
Overview
Section titled “Overview”Connect your ElevenLabs AI agents with Zendesk to manage support tickets, users, and organizations. This integration enables your agents to create and update tickets, search for existing records, manage users, and respond to incoming ticket comments.
Capabilities
Section titled “Capabilities”| Capability | Support |
|---|---|
| Zero retention mode (ZRM) | Not supported |
| Attachments in triggers | Images (PNG, JPEG, GIF, WebP) and PDF files on incoming ticket comments, when Allow file attachments is enabled in the agent settings and the agent’s LLM supports image or document input |
| Attachments in tools | Not supported — tools such as zendesk_show_ticket and zendesk_list_ticket_comments return text fields and do not download attachments |
This integration supports three authentication methods: the ElevenLabs OAuth app, your own OAuth client, and an API token.
Find your subdomain
Your Zendesk subdomain is the first part of your Zendesk URL (e.g.,
mycompanyfrommycompany.zendesk.com).Connect in ElevenLabs
In the ElevenLabs integration setup, select the OAuth2 credential, enter your subdomain, and click Connect.
Authorize the connection
Zendesk shows an authorization page listing the access the ElevenLabs app requests: read access across your account, plus write access to tickets, users, webhooks, and triggers. Sign in as a user who holds the permissions your agent needs and click Allow. Zendesk redirects you back to ElevenLabs and the connection is created.
Authorize as an administrator if you plan to use Zendesk triggers — creating webhooks and editing triggers is restricted to Zendesk admins.
OAuth scopes
Section titled “OAuth scopes”Connecting with the OAuth2 credential grants ElevenLabs the following Zendesk OAuth scopes. Read access is granted account-wide, while write access is requested per resource so the token cannot modify resources the integration does not use.
| Scope | Purpose |
|---|---|
read |
Read access to GET endpoints. Used to fetch tickets, ticket comments and their attachments, users, organizations, problem tickets, and search results, and — when a trigger is connected — to look up the Zendesk trigger and read the signing secret of the webhook ElevenLabs creates. |
tickets:write |
Create, update, delete, and merge tickets, post public and internal comments, and add or remove tags. Used by the ticket tools and to post the agent’s reply when a Zendesk trigger fires. |
users:write |
Create, update, and delete users, including bulk create-or-update. Used by the user management tools. |
webhooks:write |
Create the webhook that delivers ticket events to your agent when you activate a Zendesk trigger, and delete that webhook when you deactivate the trigger. |
triggers:write |
Add the ElevenLabs webhook action to the Zendesk trigger you name, and remove that action when you deactivate the trigger. |
A token never exceeds the permissions of the user who authorized it — the effective access is the intersection of these scopes and that user’s Zendesk role.
These scopes do not apply to the other two authentication methods: a custom OAuth client requests read and write (full read and write access), and an API token carries all permissions of the Zendesk user it belongs to.
Data disclosure
Section titled “Data disclosure”The table below lists every field the integration accesses in your Zendesk account, whether ElevenLabs stores it, and when and why it is accessed. Read means the value is used during processing but not persisted. Read & stored means it is persisted on the ElevenLabs conversation record. Written means the integration sends it to Zendesk.
| Data | Access | Reason |
|---|---|---|
| Ticket ID | Read & stored | Arrives in the trigger webhook payload — the only ticket data Zendesk pushes to ElevenLabs. Stored as the conversation’s external ID, as the integration__zendesk_ticket_id dynamic variable, and as a link back to the ticket. |
| Ticket subject | Read & stored | Read from the ticket when a trigger fires. Stored as the integration__zendesk_ticket_subject dynamic variable so the system prompt and tools can reference what the ticket is about. |
| Ticket creation timestamp | Read & stored | Read with the ticket. Stored as the integration__zendesk_ticket_created_at dynamic variable for use in the prompt, for example to reason about ticket age. |
| Requester ID | Read & stored | Read with the ticket. Stored as the integration__zendesk_ticket_requester_id dynamic variable, and used to attribute comments — a requester who is also a staff member is still treated as the customer. |
| Ticket tags | Read | Read on each trigger run to detect an agent-rating-<score> tag and a force-agent tag. Only the resulting rating is stored on the conversation; the tag list itself is not persisted. |
| Comment bodies, public and internal | Read & stored | Read from the ticket’s comments on every trigger run. Stored as the conversation transcript and sent to the agent’s LLM — this is the conversation the agent replies to. |
| Comment IDs | Read & stored | Read with the comments. The most recent ID is stored as the last-processed marker so the next trigger run skips comments the agent has already answered. |
| Comment author ID | Read & stored | Read with the comments and used to look up the author. Stored as the transcript message’s user identifier when the author has no email address. |
| Comment author role | Read | Read per comment author to decide whether a comment becomes a customer message or a staff message in the transcript. The role itself is not persisted, only the resulting attribution on each message. |
| Comment author email address | Read & stored | Read per comment author. Stored as the user identifier on transcript messages attributed to the customer, so conversations can be tied to a person across tickets. |
| Requester email address | Read & stored | Read with the requester’s user record. Stored as the integration__zendesk_ticket_requester_email dynamic variable so the prompt and tools can address or look up the customer. |
| Attachment metadata: filename, MIME type, size | Read & stored | Read with the comments to check that an attachment is a supported type and within size limits. Stored on the transcript message the attachment belongs to. |
| Attachment file contents | Read & stored | Downloaded only when Allow file attachments is enabled on the agent and its LLM supports the file type. Stored as conversation files so the agent can read what the customer sent. |
| Zendesk subdomain | Read & stored | Provided by you when connecting. Stored in the integration’s connection settings because it forms the API base URL. |
| Zendesk account email, API token authentication only | Read & stored | Provided by you when connecting. Stored in the connection settings because API token authentication sends the account email alongside the token. |
| API token, OAuth access and refresh tokens | Read & stored | Stored encrypted at rest and used only to authenticate API calls. Never exposed to the agent, the prompt, or the API. |
| Webhook signing secret | Read & stored | Read once when you activate a trigger. Stored encrypted and used to verify that inbound webhooks genuinely come from your Zendesk account. |
| Trigger title, conditions, and actions | Read | Read when you activate a trigger, to find the trigger by name and to preserve its existing actions when the ElevenLabs webhook action is added. Not persisted. |
| Agent reply | Written | Posted as a public comment on the ticket, or as an internal comment when shadow mode is on. This is the integration’s purpose. |
| Conversation link | Written | Posted once per ticket as an internal comment so staff can open the conversation in ElevenLabs. |
| Attachment error notice | Written | Posted as an internal comment when an attachment was skipped because it is an unsupported type, too large, or failed to download, so staff know the agent did not see it. |
| ElevenLabs webhook registration | Written | Created when you activate a Zendesk trigger and deleted when you deactivate it. This is the endpoint Zendesk calls on ticket events. |
| Webhook action on your trigger | Written | Added to the trigger you name when you activate it and removed when you deactivate it. Existing actions on the trigger are preserved. |
| Tickets, comments, tags, users, and organizations | Written | Written only by the Zendesk tools you enable on the agent, with the parameters the agent supplies during a conversation. No writes occur outside a tool call or a trigger reply. |
The integration calls the Zendesk API only when a connected trigger fires or when an agent invokes a Zendesk tool. It does not poll your Zendesk account and does not export data in bulk.
Records returned by Zendesk tools are stored in the conversation transcript as part of the tool call result, so a tool that reads a record also stores it. Retention of stored data follows the privacy settings of the agent that handled the ticket, including transcript and PII deletion.
Zendesk tools
Section titled “Zendesk tools”Add Zendesk tools to your agent to manage tickets, users, and organizations during conversations. Once the integration is connected, you can enable individual tools on your agent’s configuration page.
Available tools
Section titled “Available tools”The integration provides over 30 tools organized into the following categories:
- Tickets — create, update, delete, list, and search tickets. Bulk operations (create many, update many, delete many) are also available.
- Comments & tags — add public or internal comments to tickets, and add or remove tags.
- Users — look up, create, update, and delete users. Bulk create-or-update is supported for syncing user data.
- Organizations — retrieve organization details and list an organization’s tickets.
- Search — run Zendesk search queries across tickets, users, and organizations (e.g.,
type:ticket status:open).
Example tools
Section titled “Example tools”Creates a new support ticket. The agent collects details from the caller and opens a ticket on their behalf.
| Parameter | Type | Description |
|---|---|---|
ticket.subject | string | Short subject line for the ticket |
ticket.comment.body | string | Detailed description of the issue |
ticket.requester.email | string | Requester’s email address |
ticket.requester.name | string | Requester’s full name |
ticket.priority | string | urgent, high, normal, or low |
ticket.status | string | new, open, pending, hold, solved, or closed |
ticket.assignee_id | integer | Agent ID to assign the ticket to |
ticket.group_id | integer | Group ID to route the ticket to |
ticket.custom_fields | array | Array of {id, value} objects for custom fields |
Configuring tools
Section titled “Configuring tools”Add an integration tool
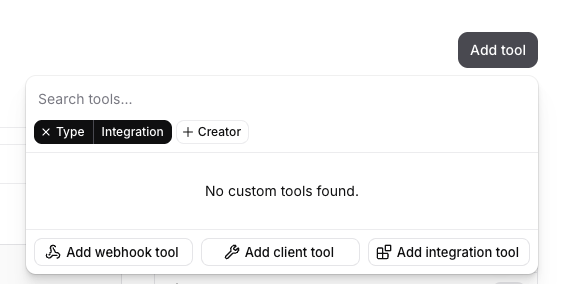
On your agent’s configuration page, click Add tool and select Add integration tool.
Select Zendesk tools
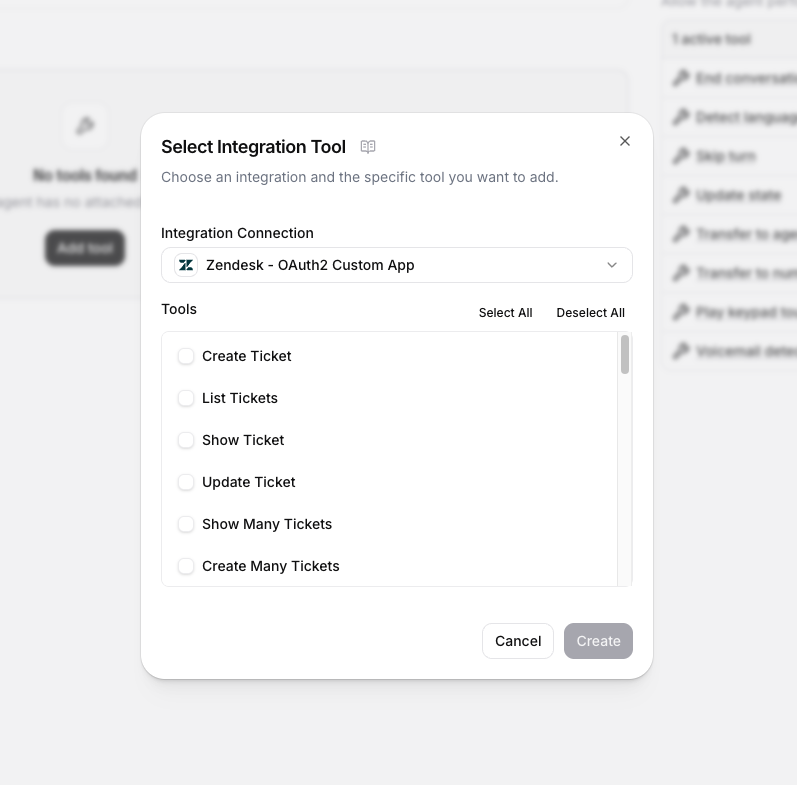
Choose your Zendesk connection and toggle the tools you want the agent to use. You can enable as many or as few as needed — for example, a read-only triage agent might only need search and list tools, while a full-service agent might also create and update tickets.
(Optional) Provide parameters
Each tool’s parameters are filled by the agent during the conversation based on what the caller says. You do not need to hard-code parameter values. However, you can optionally pre-fill or constrain specific parameters — for example, setting a default
priorityorgroup_id— to guide the agent’s behavior.
Legacy webhook setup
https://www.loom.com/embed/109404cb8aa348f5ab019feeec292c95?sid=87f90604-fb6e-421f-abed-09d571b6b46f
Zendesk Integration Demo (legacy webhook tools)
The legacy integration uses three webhook tools to create the support agent. Review each tool’s configuration in the tabs below.
Name: zendesk_get_ticket_comments Description: Retrieves the comments of a ticket. Method: GET URL: https://acmecorp.zendesk.com/api/v2/tickets/{ticket_id}/comments.json
Headers:
- Content-Type:
application/json - Authorization: (Secret:
zendesk_key)
Path Parameters:
- ticket_id: Extract the value from the
idfield in the get_resolved_tickets results.
Tool JSON:
{
  "type": "webhook",
  "name": "zendesk_get_ticket_comments",
  "description": "Retrieves the comments of a ticket.",
  "api_schema": {
    "url": "https://acmecorp.zendesk.com/api/v2/tickets/{ticket_id}/comments.json",
    "method": "GET",
    "path_params_schema": [
      {
        "id": "ticket_id",
        "type": "string",
        "description": "Extract the value from the id field in the get_resolved_tickets results.",
        "dynamic_variable": "",
        "constant_value": "",
        "required": false,
        "value_type": "llm_prompt"
      }
    ],
    "query_params_schema": [],
    "request_body_schema": null,
    "request_headers": [
      {
        "type": "secret",
        "name": "Authorization",
        "secret_id": "zendesk_api_token"
      },
      {
        "type": "value",
        "name": "Content-Type",
        "value": "application/json"
      }
    ]
  },
  "response_timeout_secs": 20,
  "dynamic_variables": {
    "dynamic_variable_placeholders": {}
  }
}Zendesk triggers
Section titled “Zendesk triggers”Configure Zendesk triggers to have your agent monitor and react to incoming ticket comments, providing first-line support.
Create a trigger in Zendesk
In Zendesk Admin Center, go to Objects and rules > Business rules > Triggers and click Add trigger. Configure the conditions that determine which ticket events the agent should respond to (e.g., new tickets in a specific group, ticket comments with a certain tag). Note the trigger name — you will need it in the next step.
If you cannot save the trigger because an action is missing, add a simple action like adding an “agent is processing” tag to the ticket.
Connect the trigger in ElevenLabs
On your agent’s configuration page, add a new trigger and select Zendesk Trigger. Configure the fields:
- Agent: the agent that handles incoming conversations.
- Trigger Rule Name: the name of the Zendesk trigger you created in the previous step.
- Daily Ticket Limit (optional): maximum number of tickets the agent handles per day. Leave empty for unlimited.
When you activate the trigger, ElevenLabs creates a webhook in your Zendesk account and adds it as an action to the trigger you specified. Deactivating the trigger removes the webhook and action.
(Optional) Check your trigger in Zendesk
In Zendesk Admin Center, go to Objects and rules > Business rules > Triggers and view your previously created trigger. You should see a new action added to it.
If you created another action previously, you can now remove it again.
Shadow mode
Section titled “Shadow mode”Enable shadow mode on a Zendesk trigger to let the agent observe and draft responses without replying to customers directly. When shadow mode is active, the agent writes its responses as internal comments on the ticket instead of public replies. Only Zendesk agents and admins can see internal comments — the end user is not notified.
Shadow mode is useful for evaluating agent quality before going live. Review the internal comments alongside the actual support responses to compare accuracy and tone, then promote the agent to active mode once you are confident in its output.
Avoiding loops
Section titled “Avoiding loops”When the agent responds to a ticket comment via the Zendesk API, that response is itself a new comment — which can re-trigger the agent and create an infinite loop. Add either of the following conditions to your Zendesk trigger to prevent this.
Exclude the service account from the trigger. Create a separate Zendesk user for the integration (e.g., ai-agent@yourcompany.com) and use this account’s credentials when connecting in ElevenLabs. Then add this condition to your Zendesk trigger:
- Current User, Is Not, <your service account>
Exclude API updates from the trigger. This filters out all updates made through the Zendesk API, regardless of which user made them:
- Ticket > Update Via, Is Not, Web Service (API)