Quickstart
In this guide, you'll learn how to create your first conversational agent. This will serve as a foundation for building conversational workflows tailored to your business use cases.
Getting started
Section titled “Getting started”ElevenLabs Agents are managed either through the ElevenAgents dashboard, the ElevenLabs API, the Agents CLI or the hosted MCP server.
Creating your first agent
Section titled “Creating your first agent”In this quickstart guide we'll start by creating an agent via the API or the web dashboard. Next we'll test the agent, either by embedding it in your website or via the ElevenLabs dashboard.
Build an agent via the web dashboard
Section titled “Build an agent via the web dashboard”In this guide, we'll create a conversational support assistant capable of answering questions about your product, documentation, or service. This assistant can be embedded into your website or app to provide real-time support to your customers.
Sign in to ElevenLabs
Section titled “Sign in to ElevenLabs”Go to elevenlabs.io and sign in to or create your account.
Create a new assistant
Section titled “Create a new assistant”In the ElevenLabs Dashboard, create a new assistant by entering a name and selecting the Blank template option.
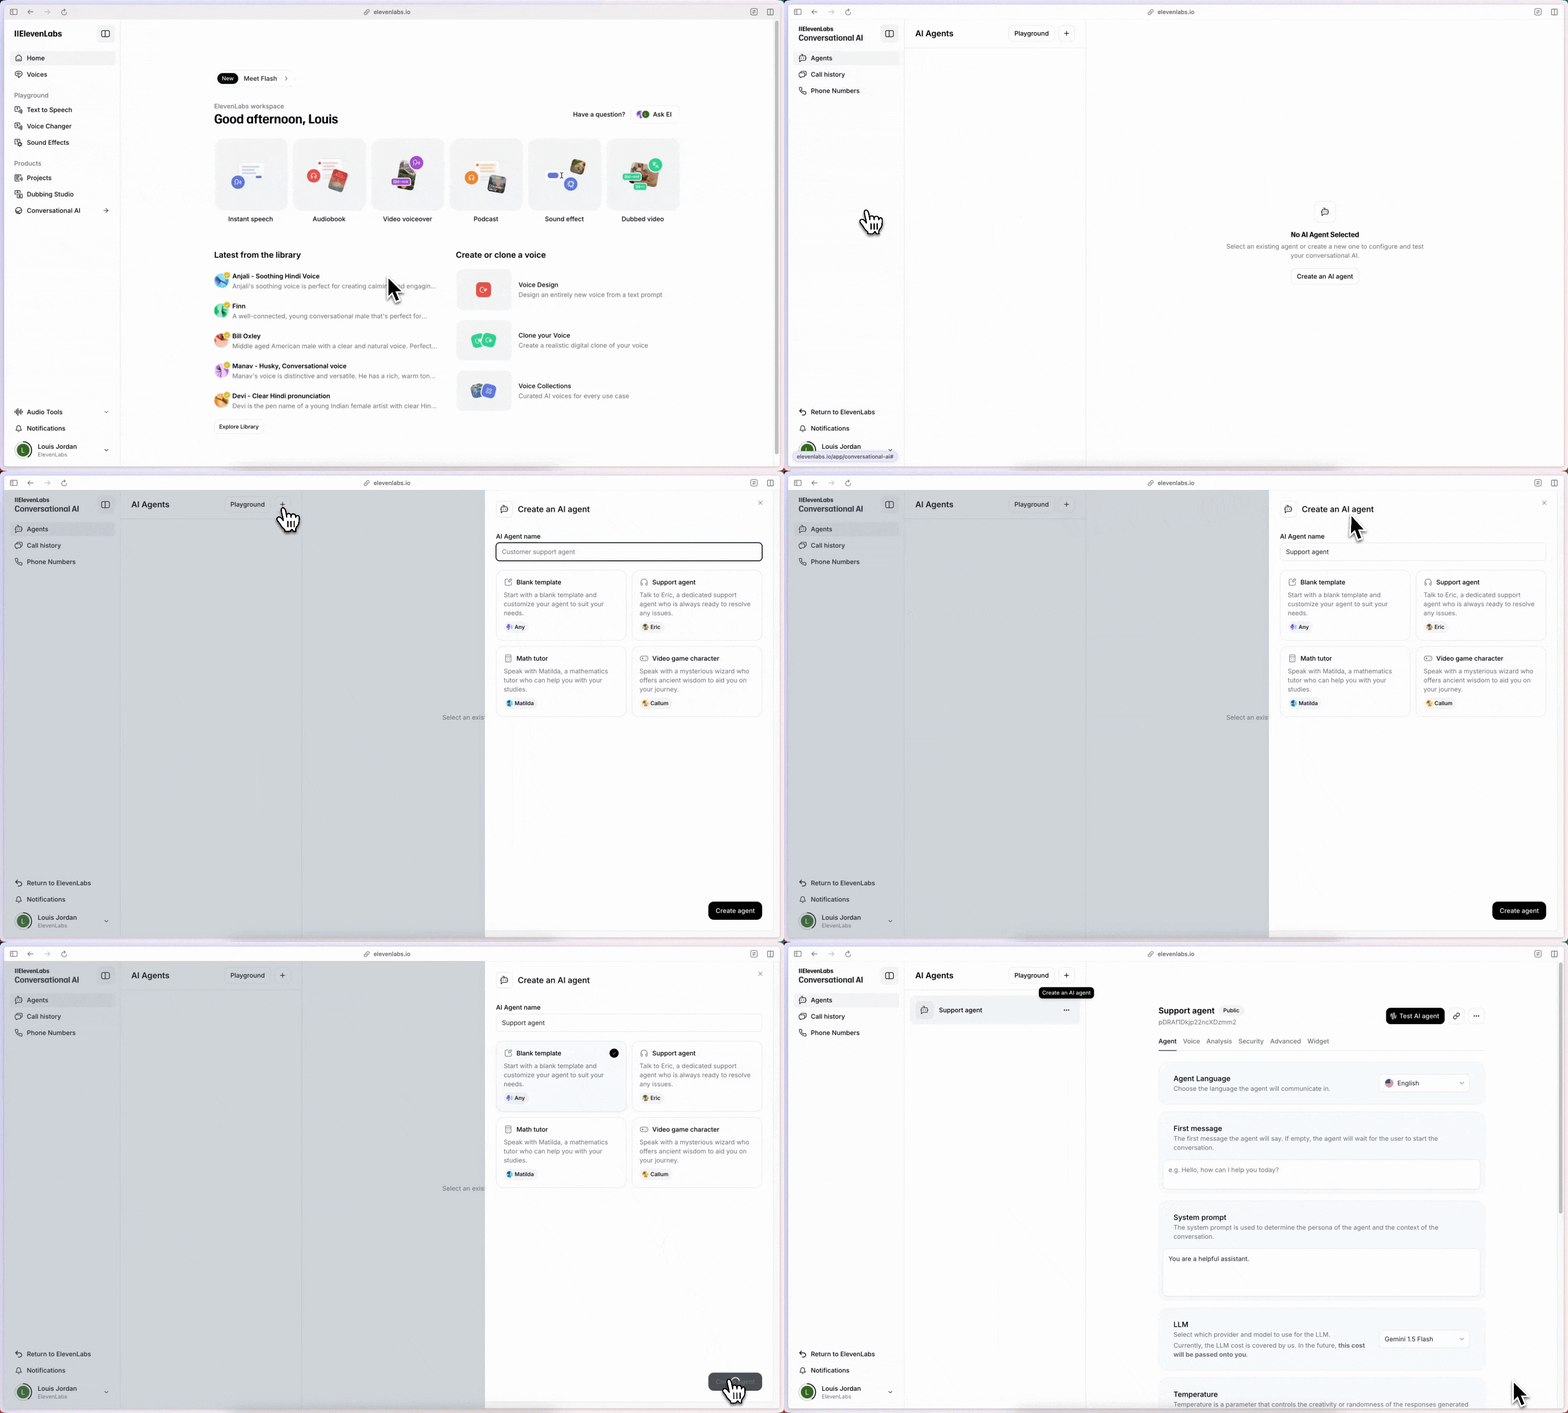
Configure the assistant behavior
Section titled “Configure the assistant behavior”Go to the Agent tab to configure the assistant's behavior. Set the following:
First message
Section titled “First message”This is the first message the assistant will speak out loud when a user starts a conversation.
First message
Hi, this is Alexis from <company name> support. How can I help you today?System prompt
Section titled “System prompt”This prompt guides the assistant's behavior, tasks, and personality.
Customize the following example with your company details:
System prompt
You are a friendly and efficient virtual assistant for [Your Company Name]. Your role is to assist customers by answering questions about the company's products, services, and documentation. You should use the provided knowledge base to offer accurate and helpful responses.

Tasks:
- Answer Questions: Provide clear and concise answers based on the available information.
- Clarify Unclear Requests: Politely ask for more details if the customer's question is not clear.

Guidelines:
- Maintain a friendly and professional tone throughout the conversation.
- Be patient and attentive to the customer's needs.
- If unsure about any information, politely ask the customer to repeat or clarify.
- Avoid discussing topics unrelated to the company's products or services.
- Aim to provide concise answers. Limit responses to a couple of sentences and let the user guide you on where to provide more detail.
Add a knowledge base
Section titled “Add a knowledge base”Go to the Knowledge Base section to provide your assistant with context about your business.
This is where you can upload relevant documents & links to external resources:
- Include documentation, FAQs, and other resources to help the assistant respond to customer inquiries.
- Keep the knowledge base up-to-date to ensure the assistant provides accurate and current information.
Next we'll configure the voice for your assistant.
Select a voice
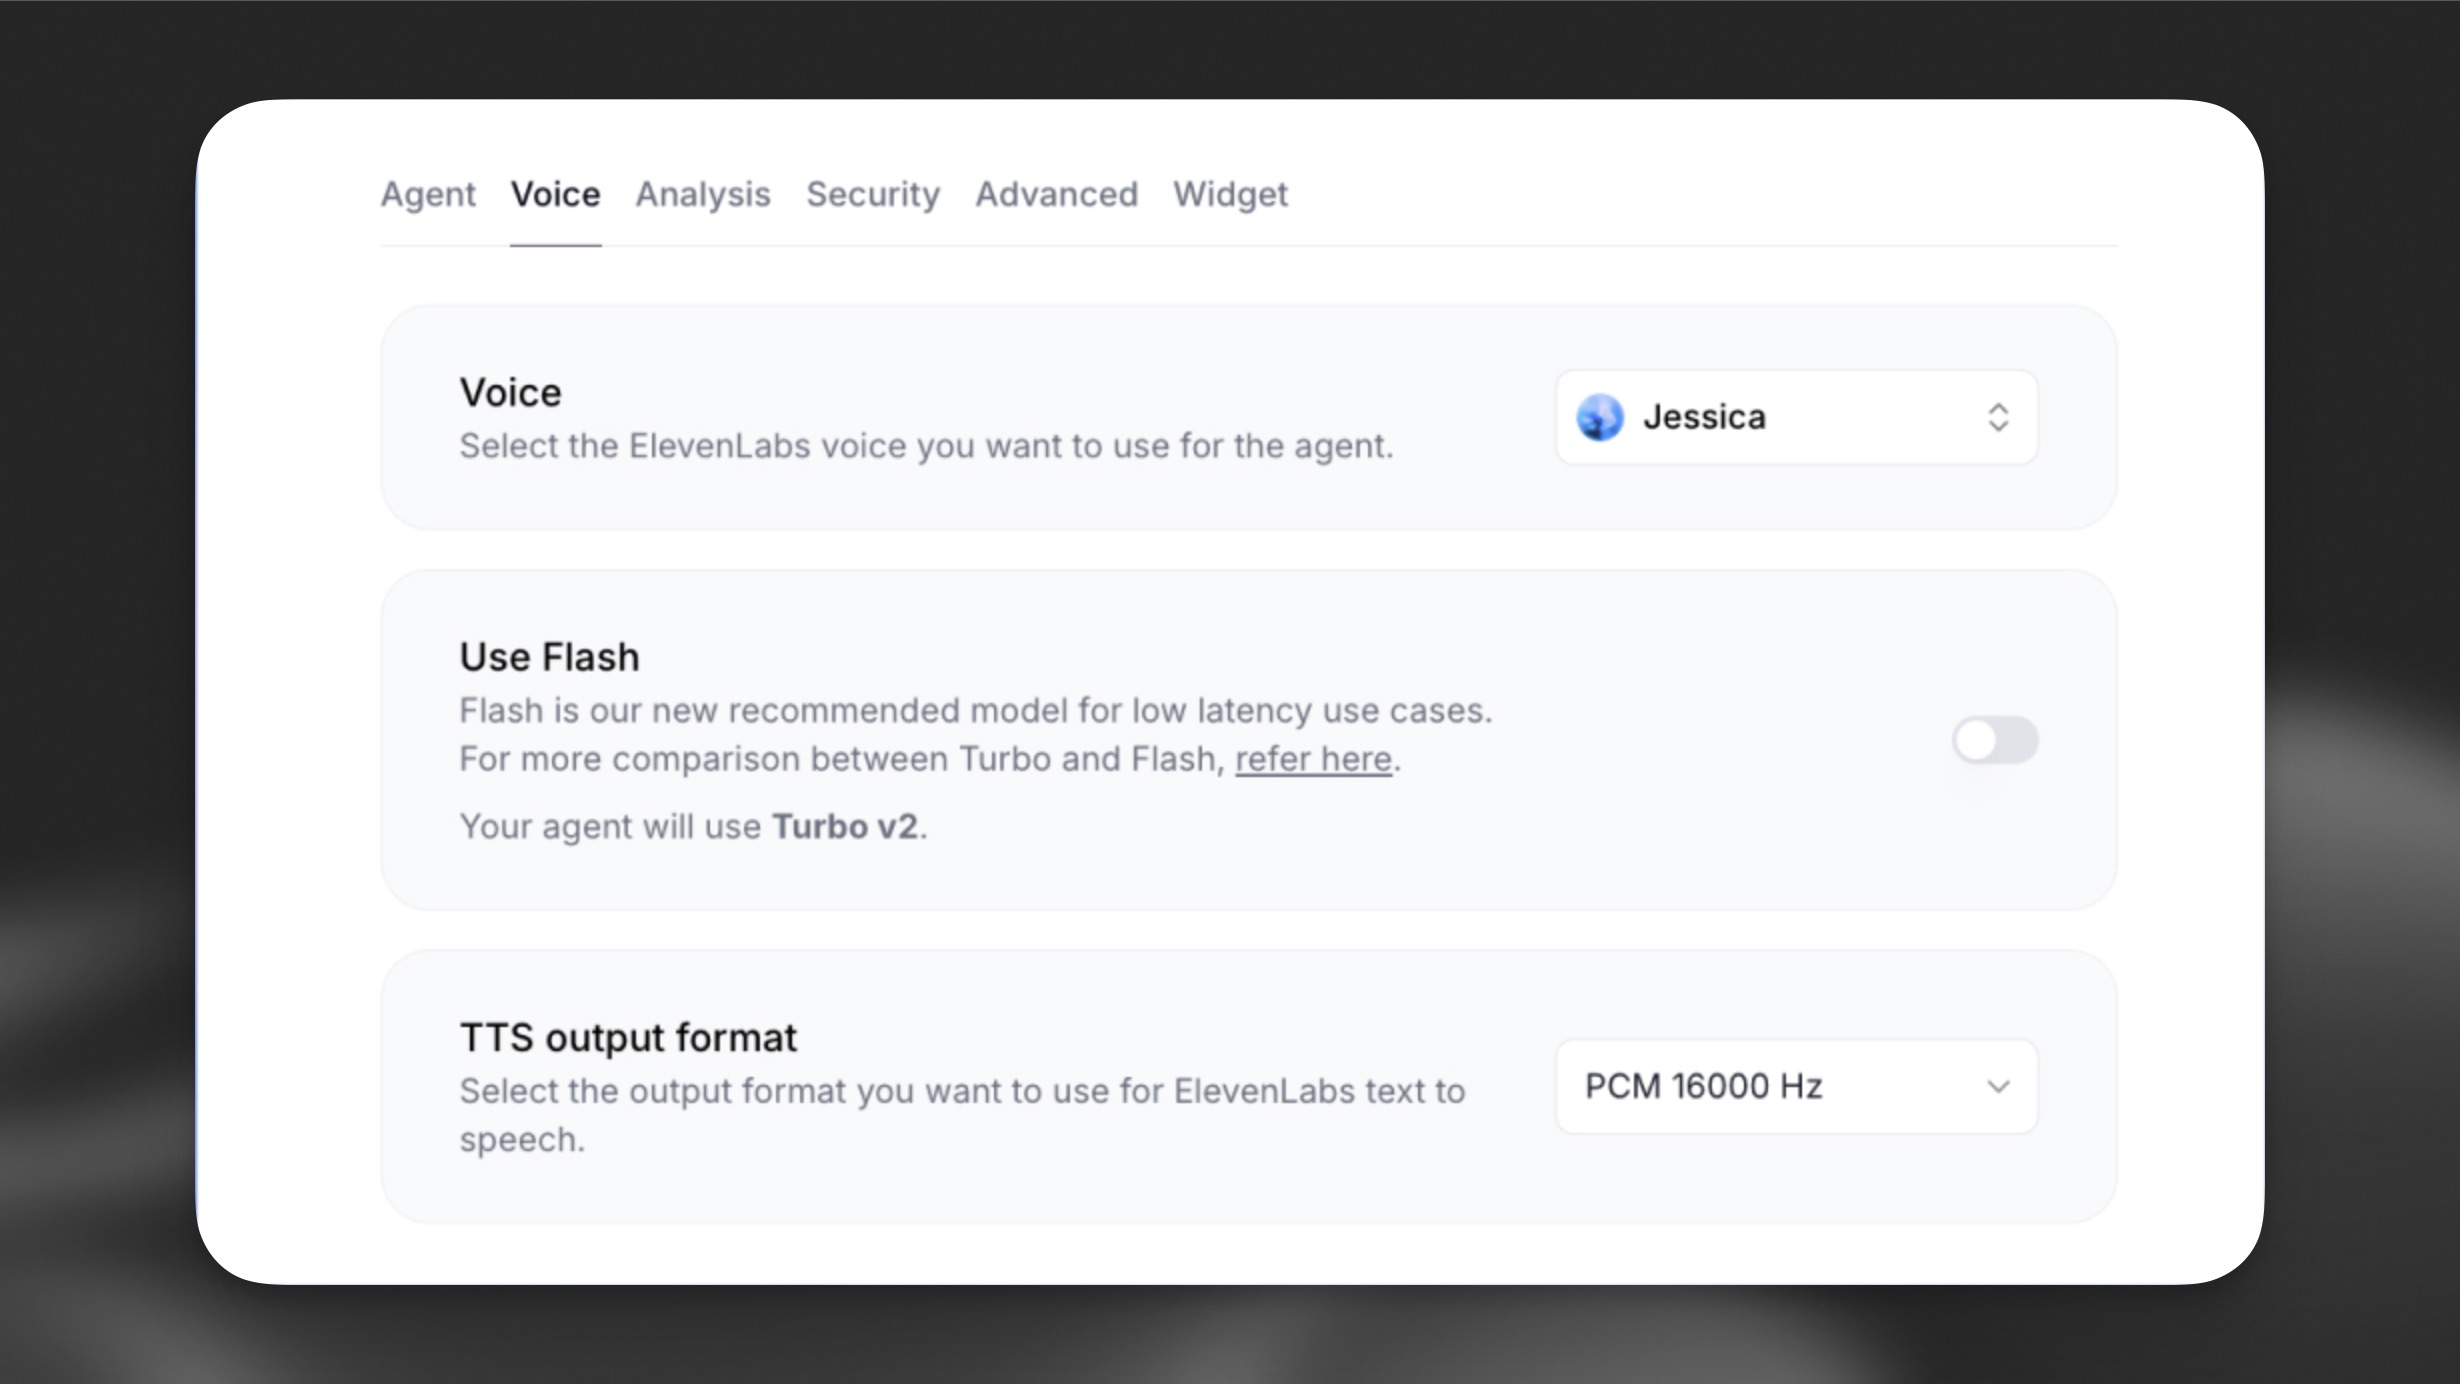
Section titled “Select a voice”In the Voice tab, choose a voice that best matches your assistant from the voice library:
Testing your assistant
Section titled “Testing your assistant”Press the Test AI agent button and try conversing with your assistant.
Configure evaluation criteria and data collection to analyze conversations and improve your assistant's performance.
Configure evaluation criteria
Section titled “Configure evaluation criteria”Navigate to the Analysis tab in your assistant's settings to define custom criteria for evaluating conversations.
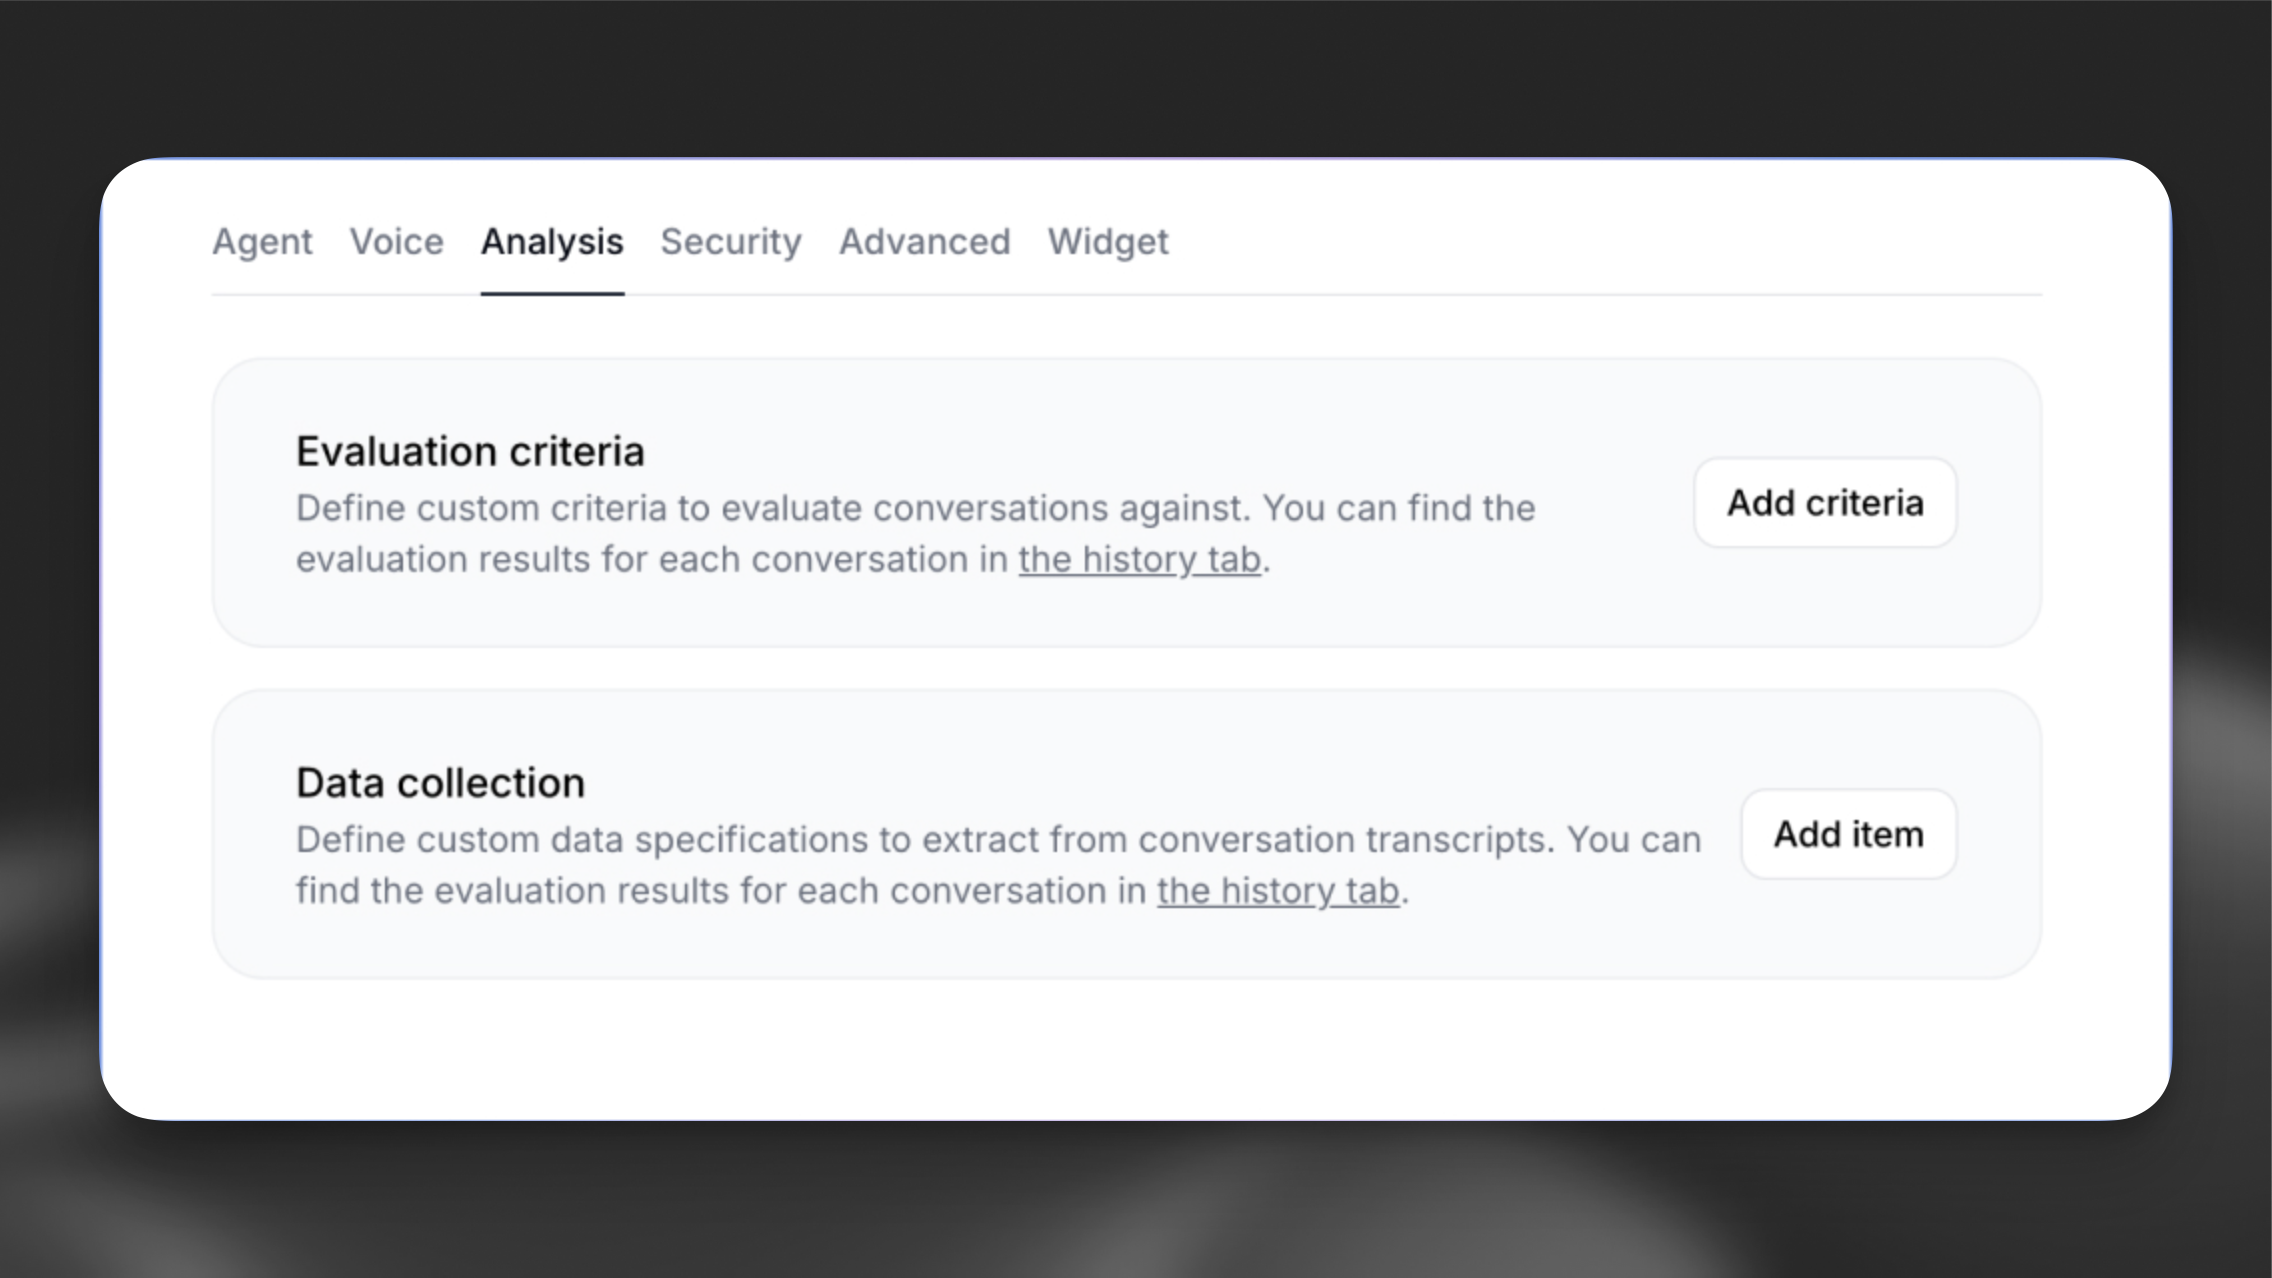
Every conversation transcript is passed to the LLM to verify if specific goals were met. Results will either be success, failure, or unknown, along with a rationale explaining the chosen result.
Let's add an evaluation criteria with the name solved_user_inquiry:
Prompt
The assistant was able to answer all of the queries or redirect them to a relevant support channel.

Success Criteria:
- All user queries were answered satisfactorily.
- The user was redirected to a relevant support channel if needed.
Configure data collection
Section titled “Configure data collection”In the Data collection section, configure details to be extracted from each conversation.
Click Add item and configure the following:
- Data type: Select "string"
- Identifier: Enter a unique identifier for this data point:
user_question - Description: Provide detailed instructions for the LLM about how to extract the specific data from the transcript:
Prompt
Extract the user's questions & inquiries from the conversation.View conversation history
Section titled “View conversation history”View evaluation results and collected data for each conversation in the Call history tab.
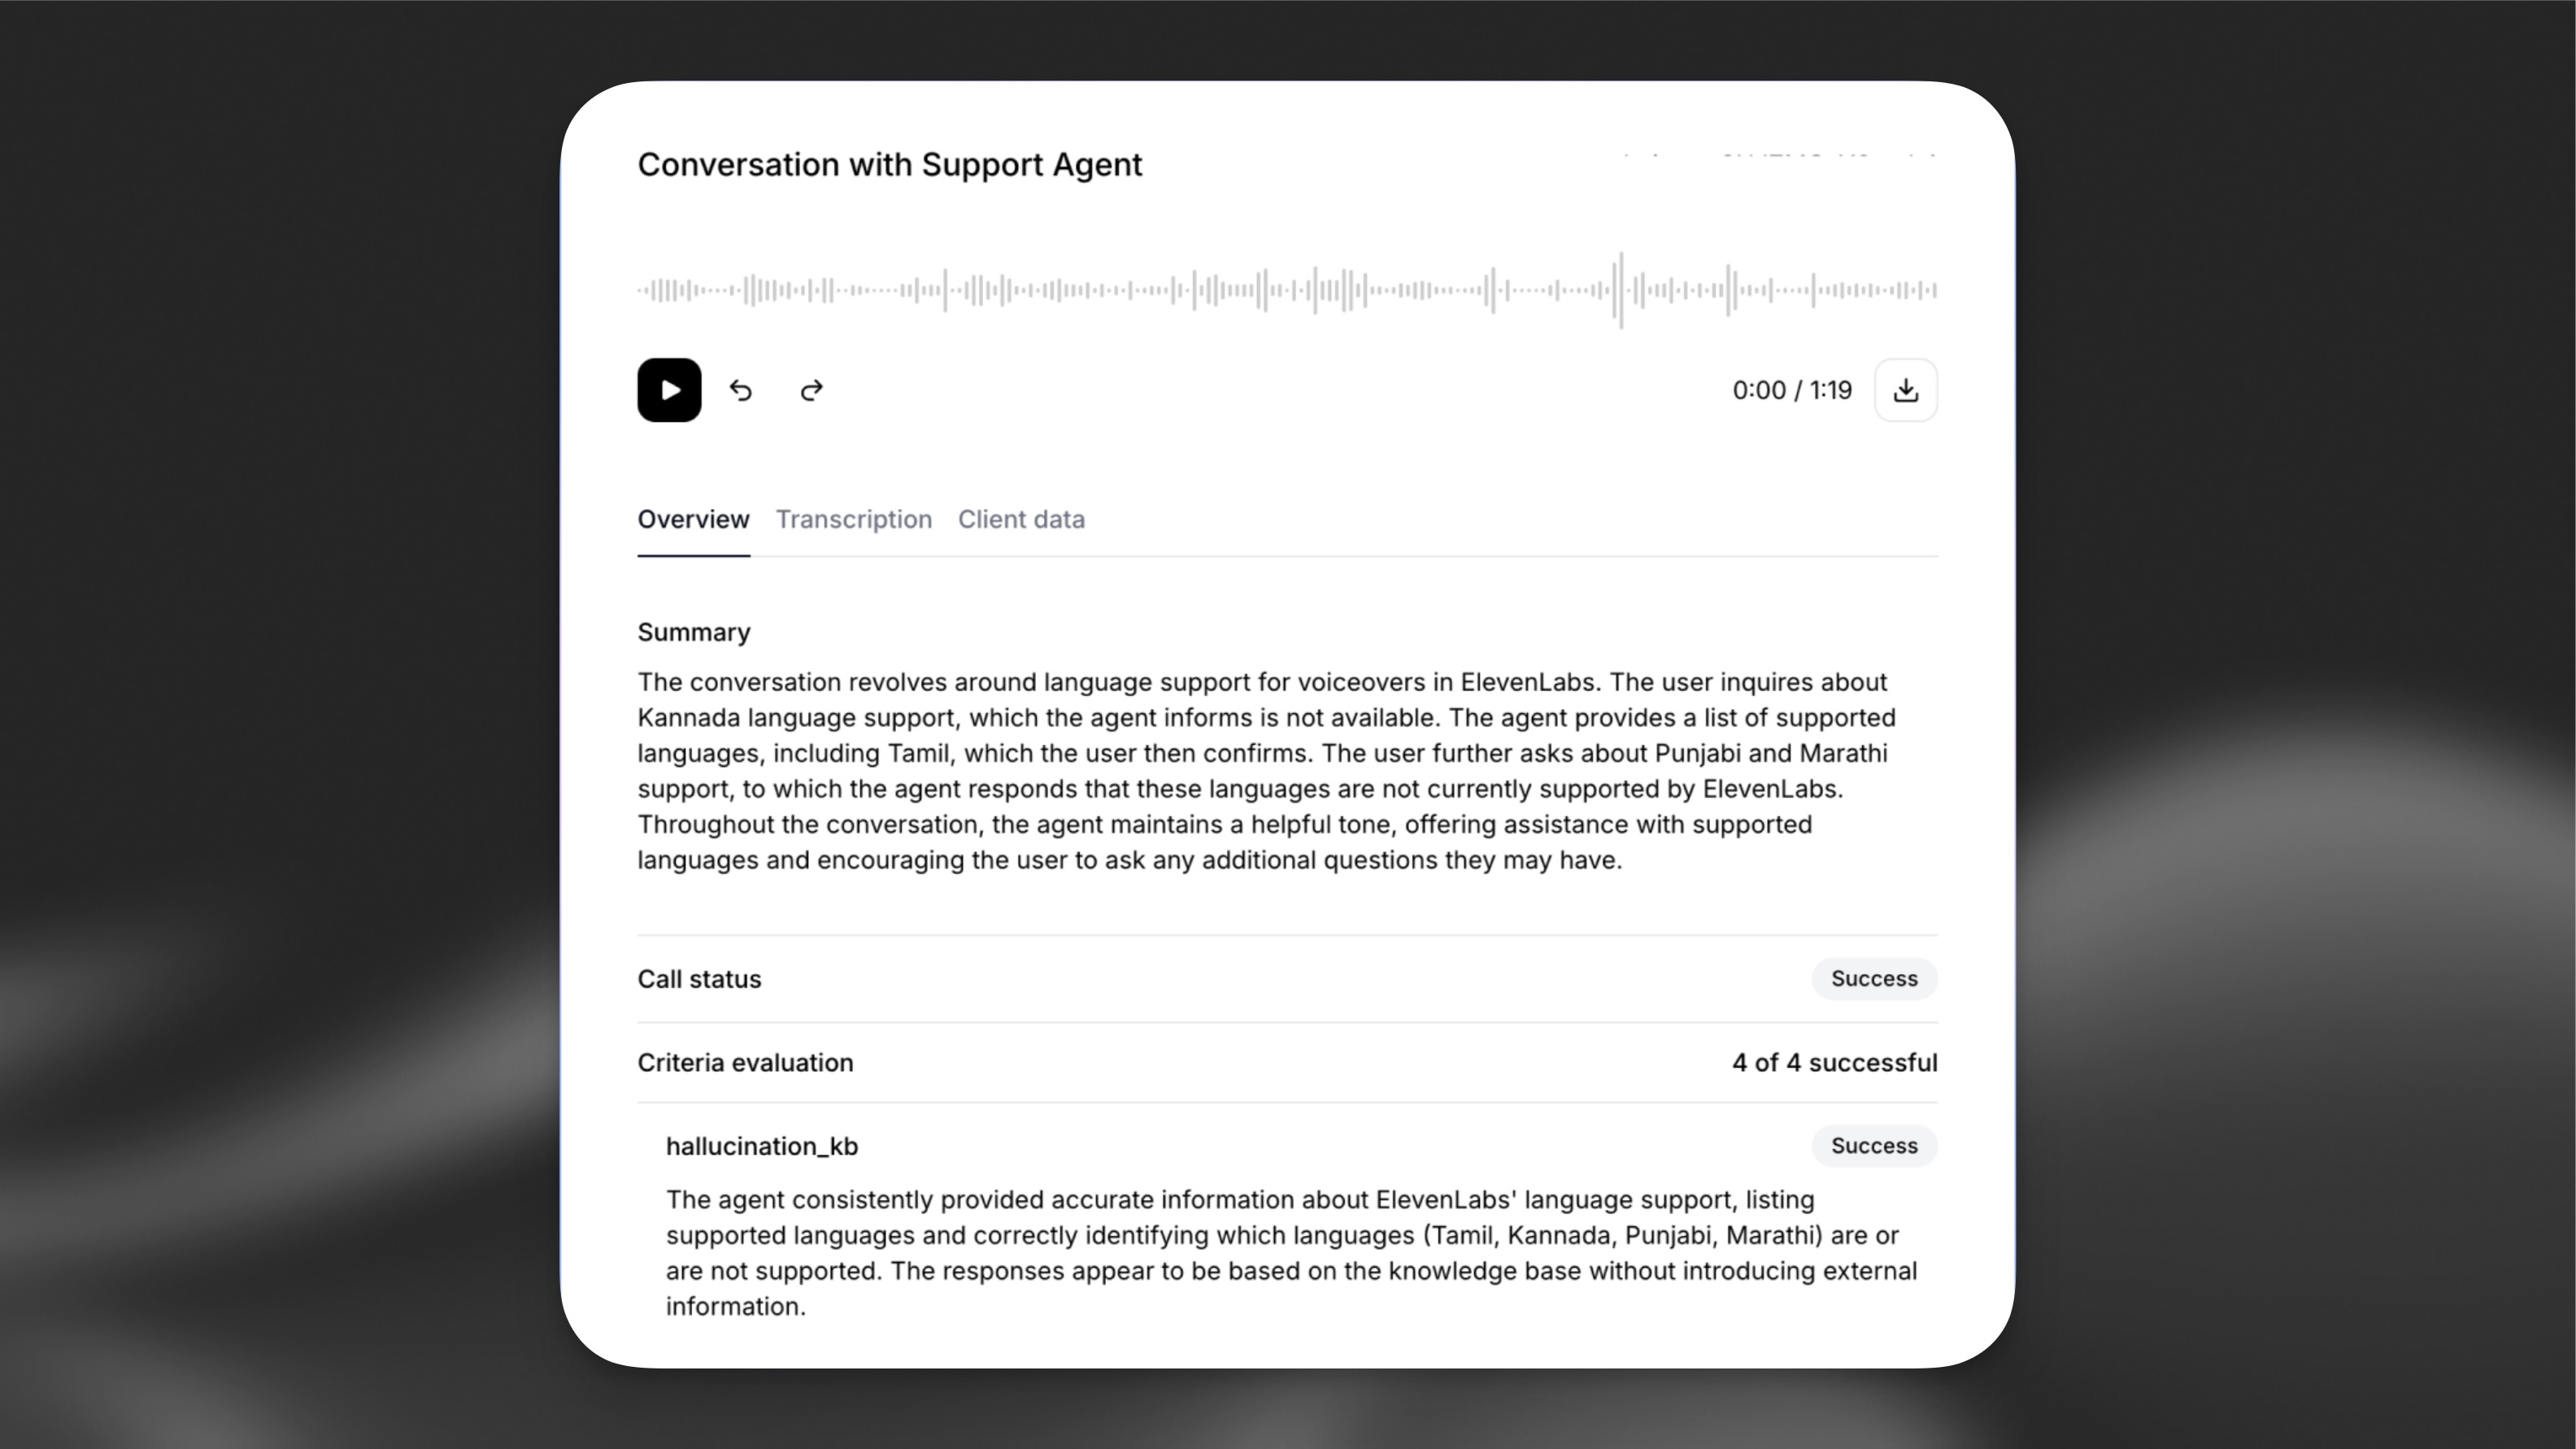
The newly created agent can be tested in a variety of ways, but the quickest way is to use the ElevenLabs dashboard.
If instead you want to quickly test the agent in your own website, you can use the Agent widget. Simply paste the following HTML snippet into your website, taking care to replace agent-id with the ID of your agent.
<elevenlabs-convai agent-id="agent-id"></elevenlabs-convai>
<script src="https://unpkg.com/@elevenlabs/convai-widget-embed" async type="text/javascript"></script>
Build an agent via the CLI
Section titled “Build an agent via the CLI”Install the CLI
Section titled “Install the CLI”Homebrew (macOS)
brew install elevenlabs/tap/elevenlabsScoop (Windows)
scoop bucket add elevenlabs https://github.com/elevenlabs/scoop-bucket
scoop install elevenlabs
npm
npm install -g @elevenlabs/clicurl
curl --proto '=https' --tlsv1.2 -LsSf https://github.com/elevenlabs/cli/releases/latest/download/elevenlabs-cli-installer.sh | shInitialize a new project
Section titled “Initialize a new project”elevenlabs agents initThis creates the project structure with configuration directories and registry files.
Authenticate with ElevenLabs
Section titled “Authenticate with ElevenLabs”Create an API key in the dashboard here, which you'll use to securely use the CLI.
Then run the following command to authenticate with ElevenLabs:
elevenlabs auth loginThis will open up a browser window to authenticate via OAuth. The CLI will verify the credentials and store them securely.
Create the agent
Section titled “Create the agent”Create your first agent using the assistant template:
elevenlabs agents add "My Assistant" --template assistantPush to ElevenLabs platform
Section titled “Push to ElevenLabs platform”elevenlabs agents pushThis uploads your local agent configuration to the ElevenLabs platform.
Test the agent
Section titled “Test the agent”The newly created agent can be tested in a variety of ways, but the quickest way is to use the ElevenLabs dashboard. From the dashboard, select your agent and click the Test AI agent button.
If instead you want to quickly test the agent in your own website, you can use the Agent widget. Use the CLI to generate the HTML snippet:
elevenlabs agents widget embed <agent_id>The agent ID is recorded in agents.json when you push, and elevenlabs agents status lists it. This will output the HTML snippet you can then paste directly into your website.
Build an agent via the API
Section titled “Build an agent via the API”Create an API key
Section titled “Create an API key”Create an API key in the dashboard here, which you’ll use to securely access the API.
Store the key as a managed secret and pass it to the SDKs either as a environment variable via an .env file, or directly in your app’s configuration depending on your preference.
.env
ELEVENLABS_API_KEY=<your_api_key_here>Install the SDK
Section titled “Install the SDK”We'll also use the dotenv library to load our API key from an environment variable.
pip install elevenlabs
pip install python-dotenvnpm install @elevenlabs/elevenlabs-js
npm install dotenvInstall the ElevenLabs CLI. Homebrew (macOS) and Scoop (Windows) are recommended.
Homebrew (macOS)
brew install elevenlabs/tap/elevenlabsScoop (Windows)
scoop bucket add elevenlabs https://github.com/elevenlabs/scoop-bucket
scoop install elevenlabs
npm
npm install -g @elevenlabs/clicurl
curl --proto '=https' --tlsv1.2 -LsSf https://github.com/elevenlabs/cli/releases/latest/download/elevenlabs-cli-installer.sh | shThen authenticate — this opens your browser to authorize the CLI:
elevenlabs auth loginCreate the agent
Section titled “Create the agent”Create a new file named create_agent.py or createAgent.mts, depending on your language of choice and add the following code:
from dotenv import load_dotenv
from elevenlabs.client import ElevenLabs
import os
load_dotenv()

elevenlabs = ElevenLabs(
    api_key=os.getenv("ELEVENLABS_API_KEY"),
)

prompt = """
You are a friendly and efficient virtual assistant for [Your Company Name].
Your role is to assist customers by answering questions about the company's products, services,
and documentation. You should use the provided knowledge base to offer accurate and helpful responses.

Tasks:
- Answer Questions: Provide clear and concise answers based on the available information.
- Clarify Unclear Requests: Politely ask for more details if the customer's question is not clear.

Guidelines:
- Maintain a friendly and professional tone throughout the conversation.
- Be patient and attentive to the customer's needs.
- If unsure about any information, politely ask the customer to repeat or clarify.
- Avoid discussing topics unrelated to the company's products or services.
- Aim to provide concise answers. Limit responses to a couple of sentences and let the user guide you on where to provide more detail.
"""

response = elevenlabs.conversational_ai.agents.create(
    name="My voice agent",
    tags=["test"], # List of tags to help classify and filter the agent
    conversation_config={
        "tts": {
            "voice_id": "aMSt68OGf4xUZAnLpTU8",
            "model_id": "eleven_flash_v2"
        },
        "agent": {
            "first_message": "Hi, this is Rachel from [Your Company Name] support. How can I help you today?",
            "prompt": {
                "prompt": prompt,
            }
        }
    }
)

print("Agent created with ID:", response.agent_id)import { ElevenLabsClient } from "@elevenlabs/elevenlabs-js";
import "dotenv/config";
const elevenlabs = new ElevenLabsClient();
const prompt = `
You are a friendly and efficient virtual assistant for [Your Company Name].
Your role is to assist customers by answering questions about the company's products, services,
and documentation. You should use the provided knowledge base to offer accurate and helpful responses.
Tasks:
- Answer Questions: Provide clear and concise answers based on the available information.
- Clarify Unclear Requests: Politely ask for more details if the customer's question is not clear.
Guidelines:
- Maintain a friendly and professional tone throughout the conversation.
- Be patient and attentive to the customer's needs.
- If unsure about any information, politely ask the customer to repeat or clarify.
- Avoid discussing topics unrelated to the company's products or services.
- Aim to provide concise answers. Limit responses to a couple of sentences and let the user guide you on where to provide more detail.
`;
const agent = await elevenlabs.conversationalAi.agents.create({
name: "My voice agent",
tags: ["test"], // List of tags to help classify and filter the agent
conversationConfig: {
tts: {
voiceId: "aMSt68OGf4xUZAnLpTU8",
modelId: "eleven_flash_v2",
},
agent: {
firstMessage: "Hi, this is Rachel from [Your Company Name] support. How can I help you today?",
prompt: {
prompt,
}
},
},
});
console.log(`Agent created with ID: ${agent.agentId}`);Run the code
Section titled “Run the code”python create_agent.pynpx tsx createAgent.mtsThe above will generate an agent with some baseline settings and print the ID of the agent to the console. We'll customize the agent in a subsequent step.
Test the agent
Section titled “Test the agent”The newly created agent can be tested in a variety of ways, but the quickest way is to use the ElevenLabs dashboard. From the dashboard, select your agent and click the Test AI agent button.
If instead you want to quickly test the agent in your own website, you can use the Agent widget. Simply paste the following HTML snippet into your website, taking care to replace agent-id with the ID of your agent.
<elevenlabs-convai agent-id="agent-id"></elevenlabs-convai>
<script src="https://unpkg.com/@elevenlabs/convai-widget-embed" async type="text/javascript"></script>
View the SDKs tab to learn how to embed the agent in your website or app using the provided SDKs.
Next steps
Section titled “Next steps”As a follow up to this quickstart guide, you can make your agent more effective by integrating:
- Knowledge bases to equip it with domain-specific information.
- Tools to allow it to perform tasks on your behalf.
- Authentication to restrict access to certain conversations.
- Success evaluation to analyze conversations and improve its performance.
- Data collection to collect data about conversations and improve its performance.
- Conversation retention to view conversation history and improve its performance.